 ちゃんころ
ちゃんころブログやWebサイトへの集客でPinterest(ピンタレスト)のボードを効果的に利用する方法を解説します。
Pinterestでボードを作成する場合に、何も考えずに作成すると集客効果のないボードを作成してしまうことになります。
ボード作成にはいくつかの効果的な利用方法があります。
- Pinterestのボードって何?
- Pinterestのボードの作成方法を知りたい。
- Pinterestのボードの効果的な利用方法が知りたい。
- Pinterestでブログへの集客効果を最大化したい。
上記のような悩みや疑問を抱いている方は、当記事を読めば誰でも10分でPinterestのボードの作成方法と効果的な利用方法がわかります。
Pinterestのアカウント登録は完了したけど、どのようにブログやWebサイトの集客に繋げれば良いかわからない方は、当記事の方法でボードを作成してください。
Pinterestのボードとは
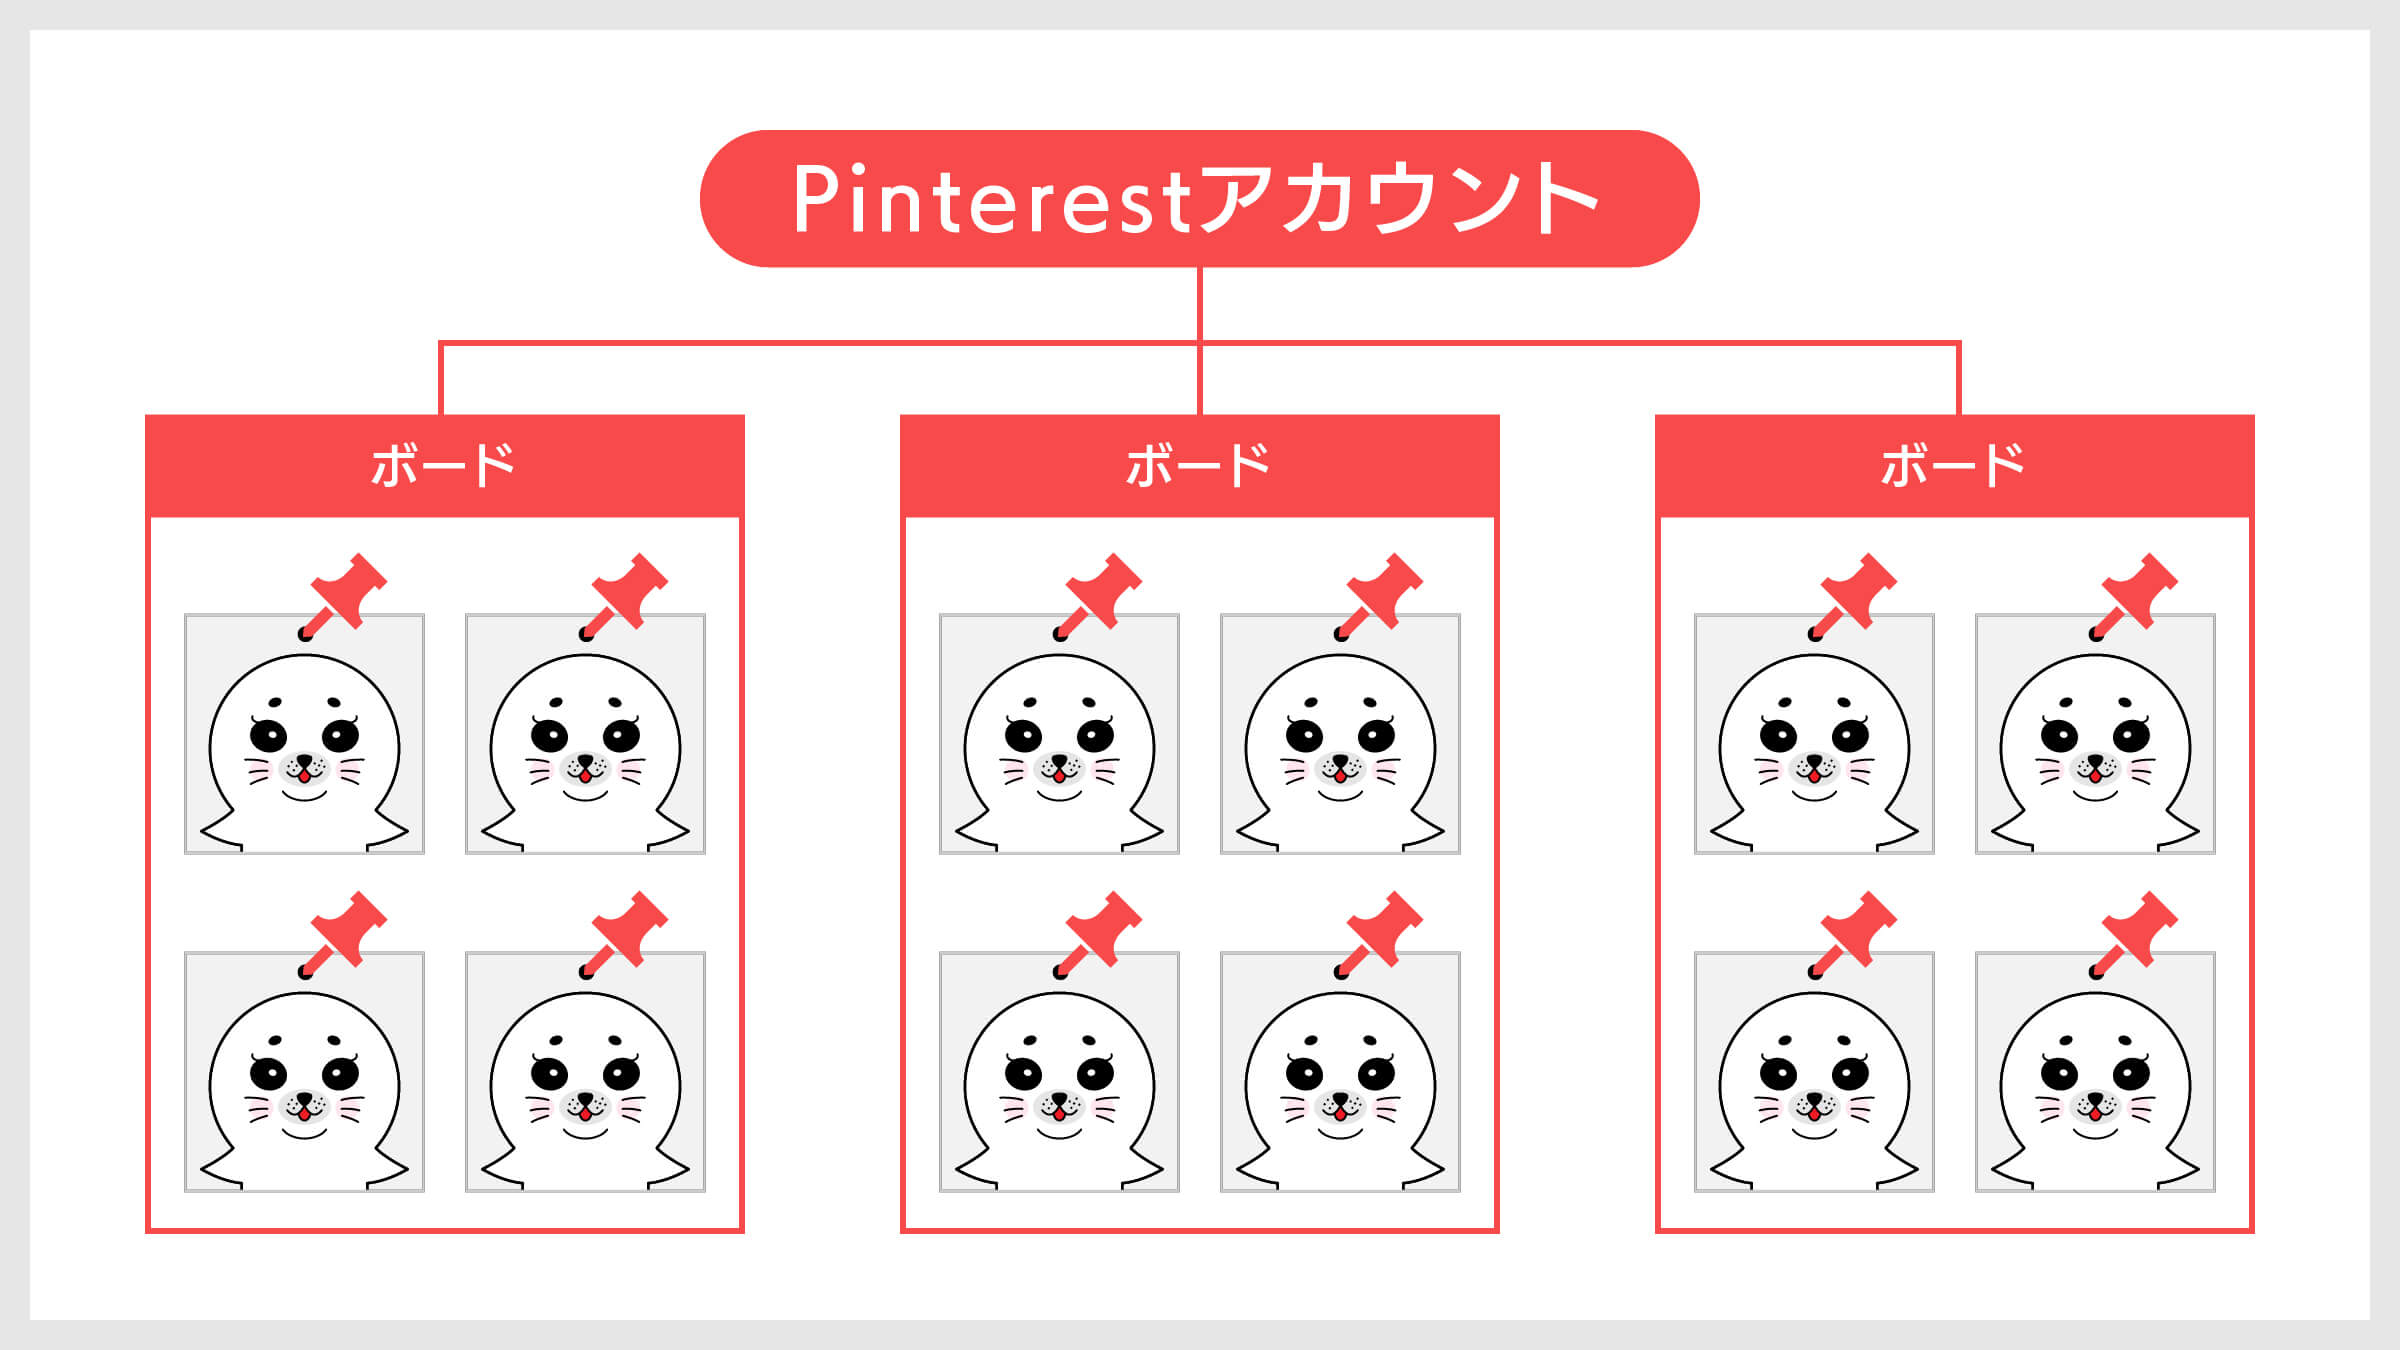
Pinterestのボードとは、ピンを整理して保存するための「カテゴリフォルダ」のことです。
ボードの活用方法として関連性の高いピン同士を同じボードに入れることで、ユーザーがボード内のピンを回遊してくれる可能性が高くなります。
特にブログやWebサイトを運用している方の場合は、ブログのカテゴリと合わせることで、ユーザーがPinterestを経由してブログに来訪しても、同じカテゴリ内を回遊してくれる効果もあります。
ボードとピンの良い関係
ボードはブログのカテゴリと合わせることで、同じカテゴリに登録されている記事とピンも合わせることができます。
「ボードとピン」はブログで言うところの「カテゴリと記事」の関係です。
「Pinterestのピンを作成して効果的に利用する方法」について詳しく知りたい方は、下記の記事をご確認ください。
Pinterestのボードの種類と特徴
ボードにはいくつかの種類が用意されています。
ボードの種類によって特徴が異なるので、詳しく解説します。
- ボード
- サブボード
- グループボード
- シークレットボード
ボード
Pinterestのボードは前述した通り「カテゴリフォルダ」の役割があります。
うまく活用することでピンを整理して見やすくすることができます。
ボードの上限数は2,000件なので、十分すぎるほどの数が許容されています。
サブボード
Pinterestのボードには「サブボード」というボードの中にボードを作成する機能が用意されています。
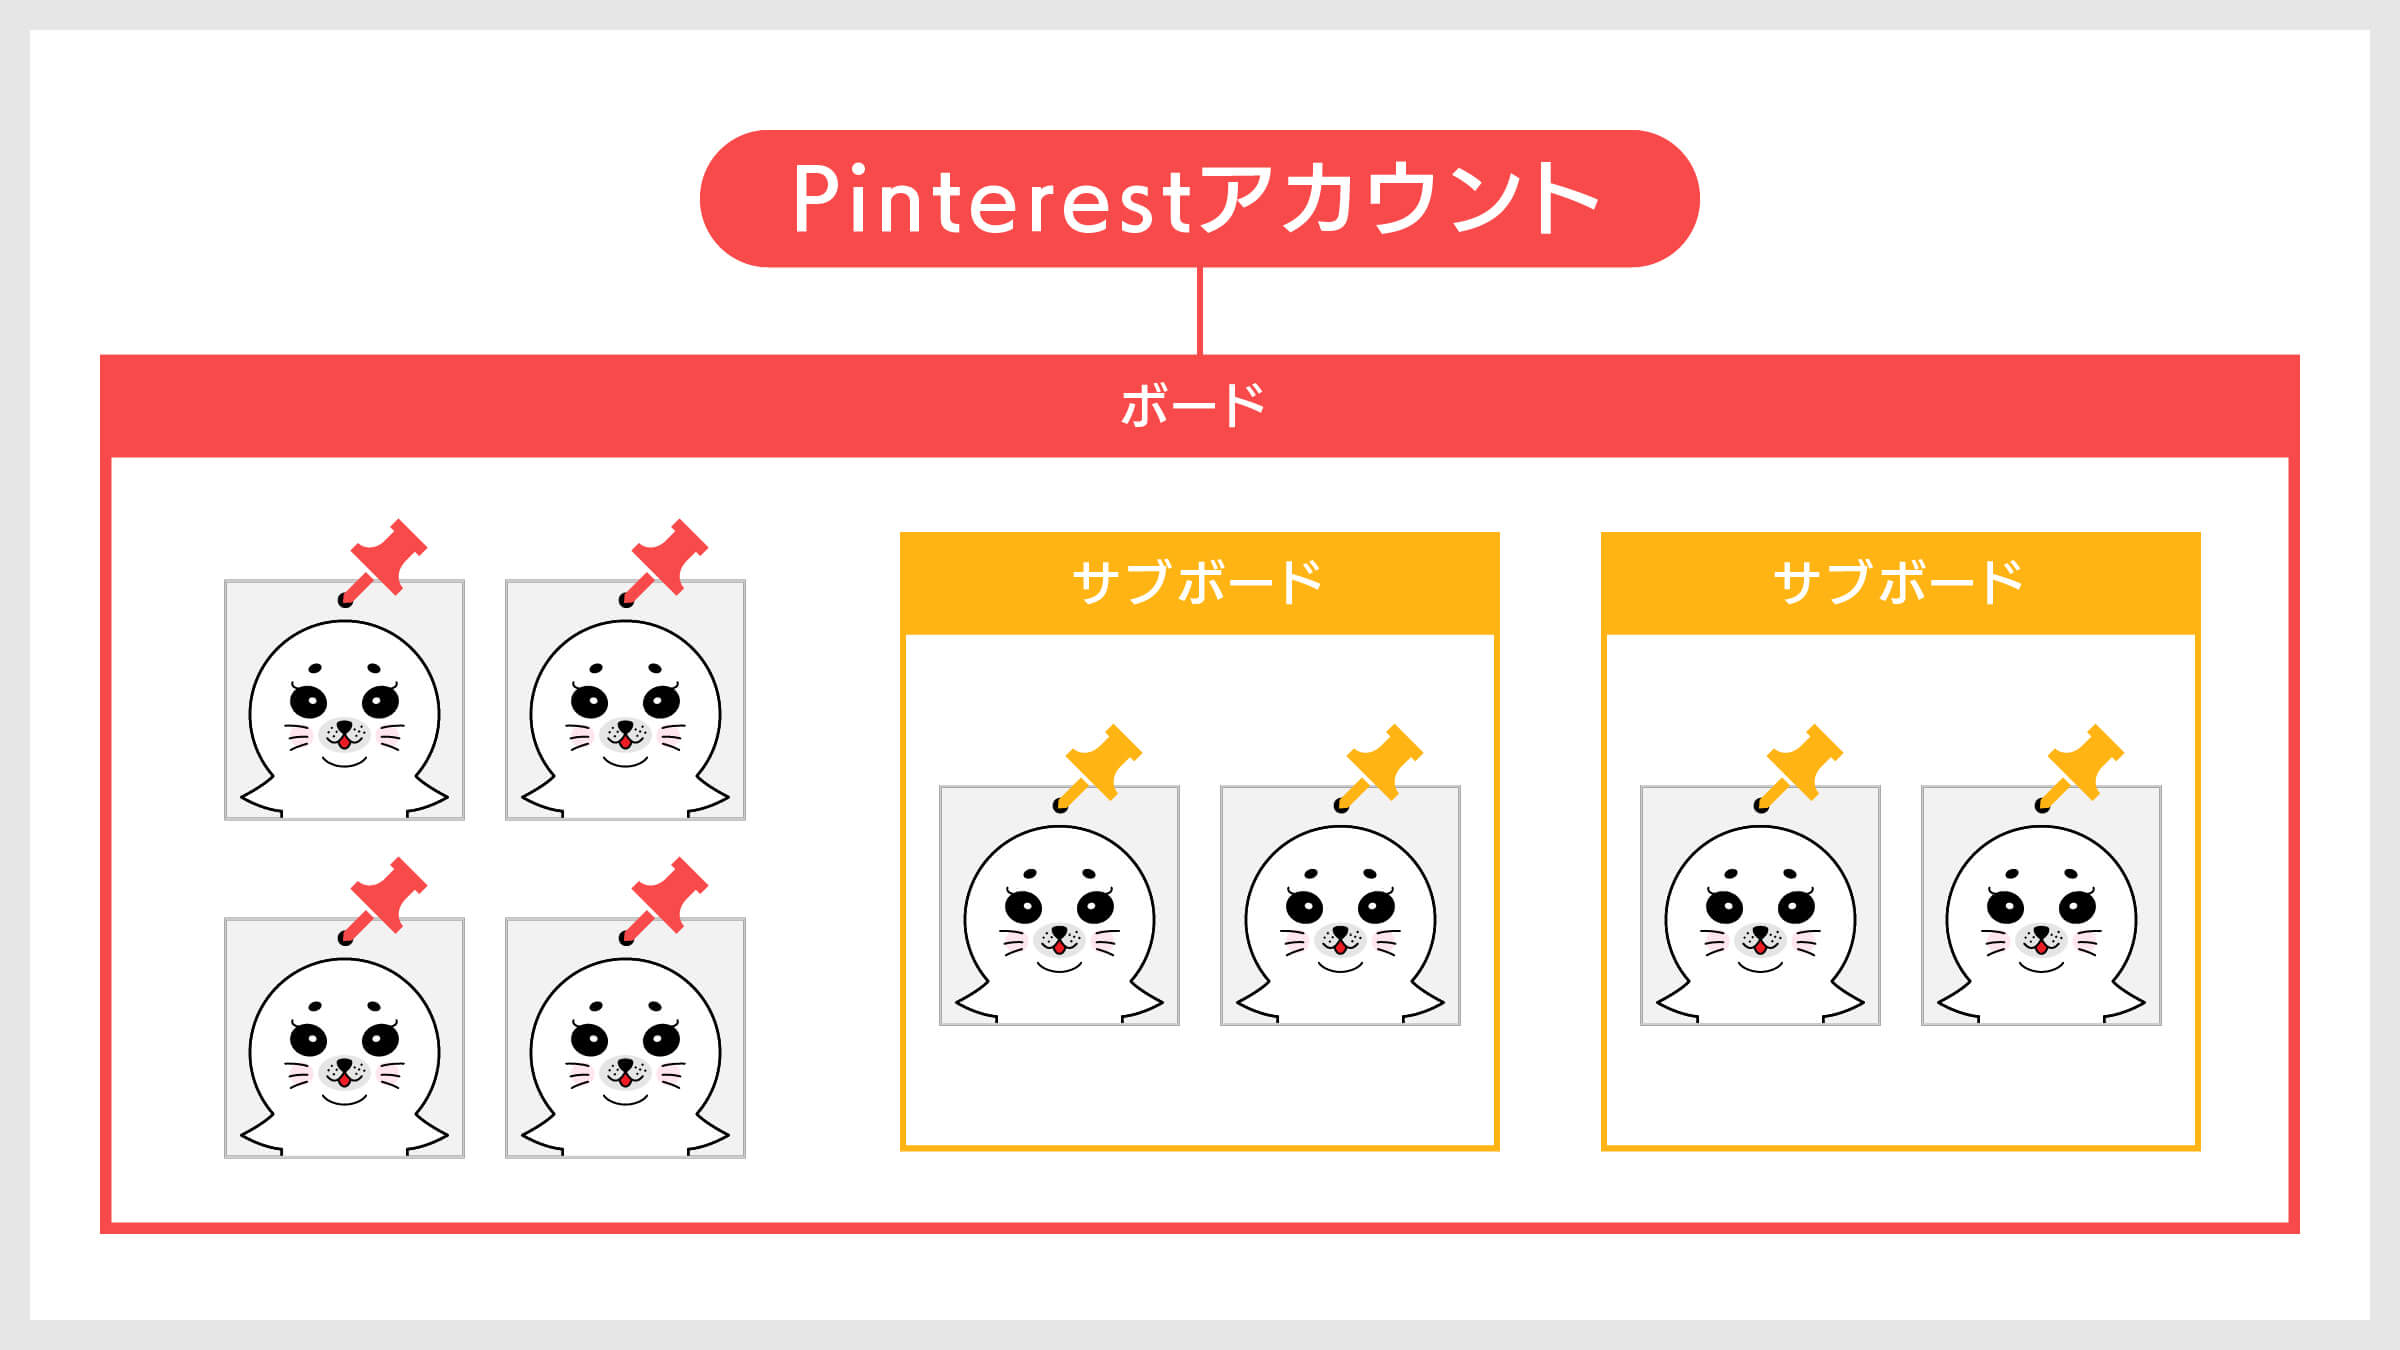
ブログやWebサイトのカテゴリ機能で言うところの「子カテゴリ」のことです。
親カテゴリの下に子カテゴリが紐づくイメージと同じです。
細かく整理してピンを管理したい方は、サブボードを利用することでボード内のピンを見やすくすることができます。
細かくしすぎて余計に管理が煩雑になったり、見づらくならないようにしましょう。
グループボード
グループボードは、ボードにユーザーを招待してピンを共有することができます。
パソコンやインターネットストレージの共有フォルダと同じです。
複数名招待して利用することもできます。
逆に招待されたグループボードのピンを見ることもできます。
友達同士や仕事仲間でアイデアを共有したい時に利用するのが効果的です。
シークレットボード
シークレットボードとは、その名の通り自分と招待したユーザーしか見れない非公開ボードです。
秘匿性の高いボードになっているので、他のユーザーに見られたくない場合に利用します。
シークレットボードにリピンしても、リピン先のアカウントには通知が届かないようになっています。
Pinterestのボード作成方法
「Pinterestのボード作成方法」について解説します。
ボードの種類によって作成方法が異なります。
Pinterestの登録がまだの方は「ビジネスアカウント」で登録しましょう。
「Pinterestのビジネスアカウント登録方法とブログ自動連携」について詳しく知りたい方は、下記の記事をご確認ください。
ボードを作成する
ブログやWebサイト集客が目的でPinterestを運用している場合は、ボードを計画的に作成する必要があります。
ブログ記事に誘導するためのピンと関連付けたボードを作成し、ブログ内のカテゴリとも生合成のあるボードにしておくことで、ユーザーがボードとブログを回遊しやすくなります。
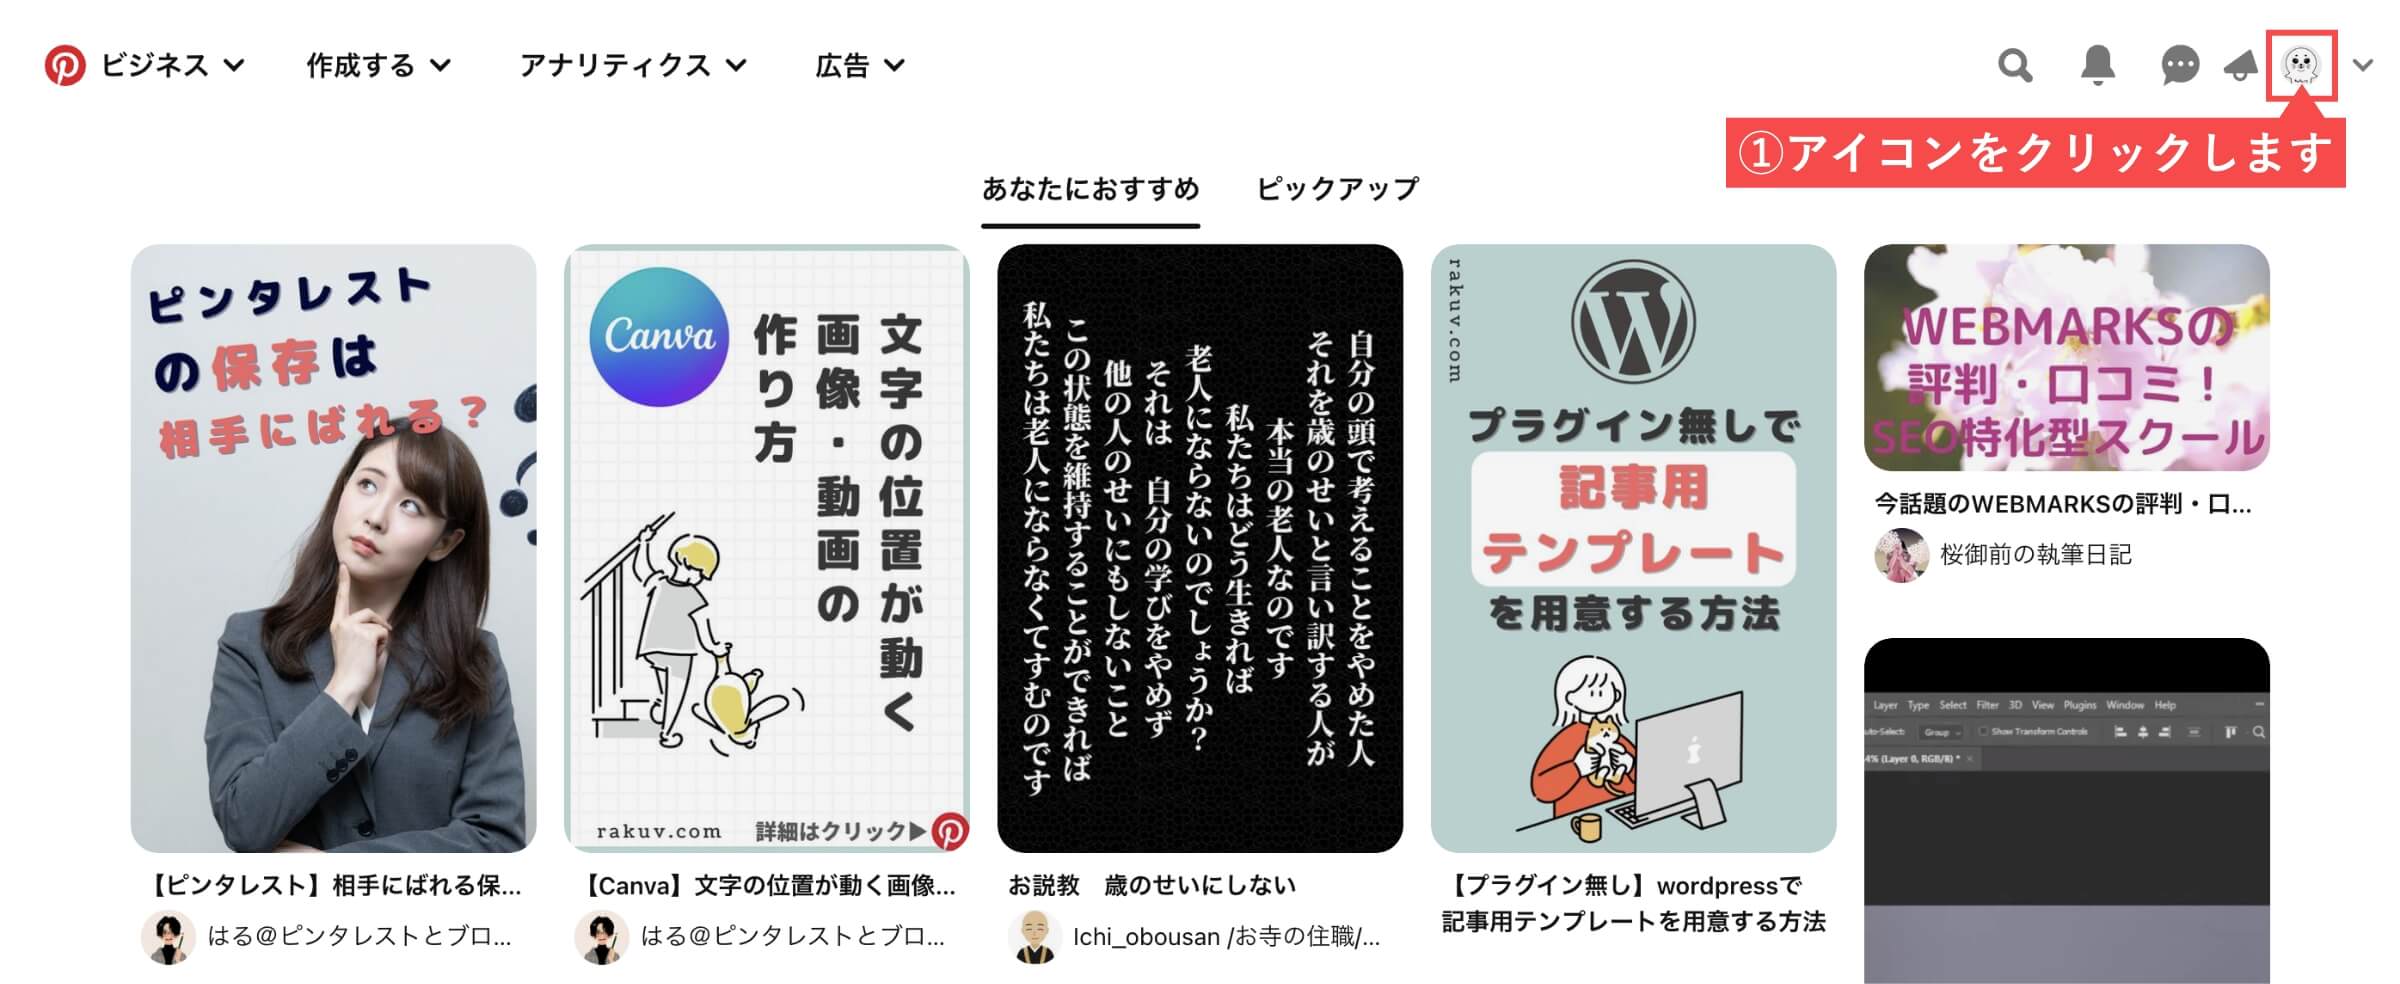
Pinterestのアカウントページから解説します。
- 右上の「アイコン」をクリックします。
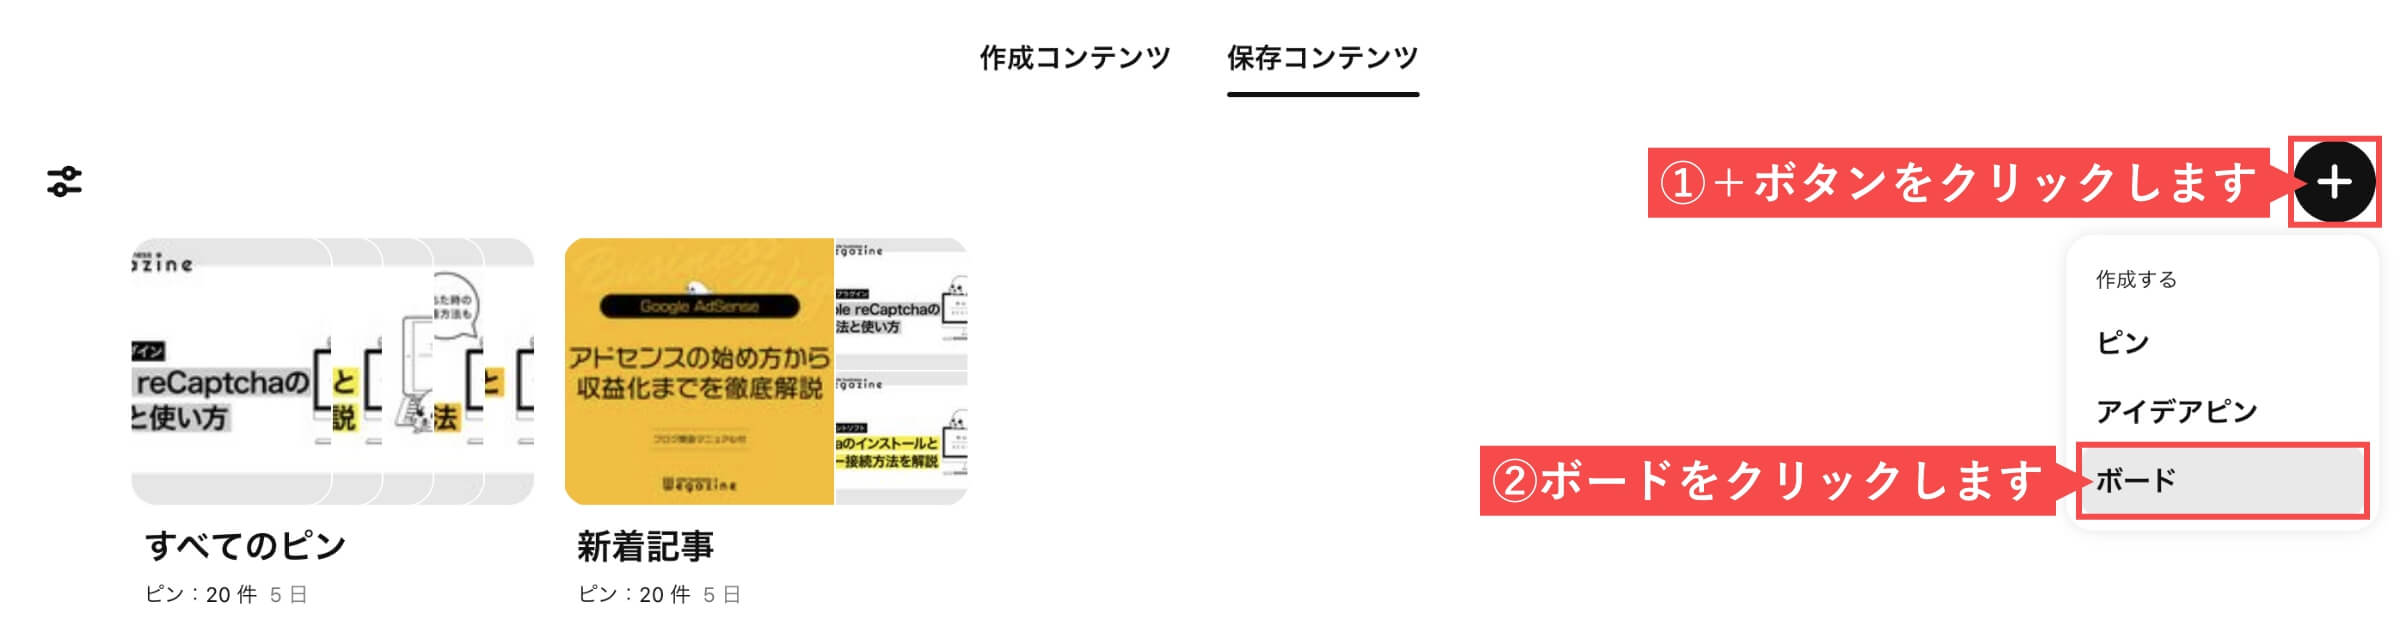
- 「+(プラス)」ボタンをクリックします。
- 「ボード」をクリックします。
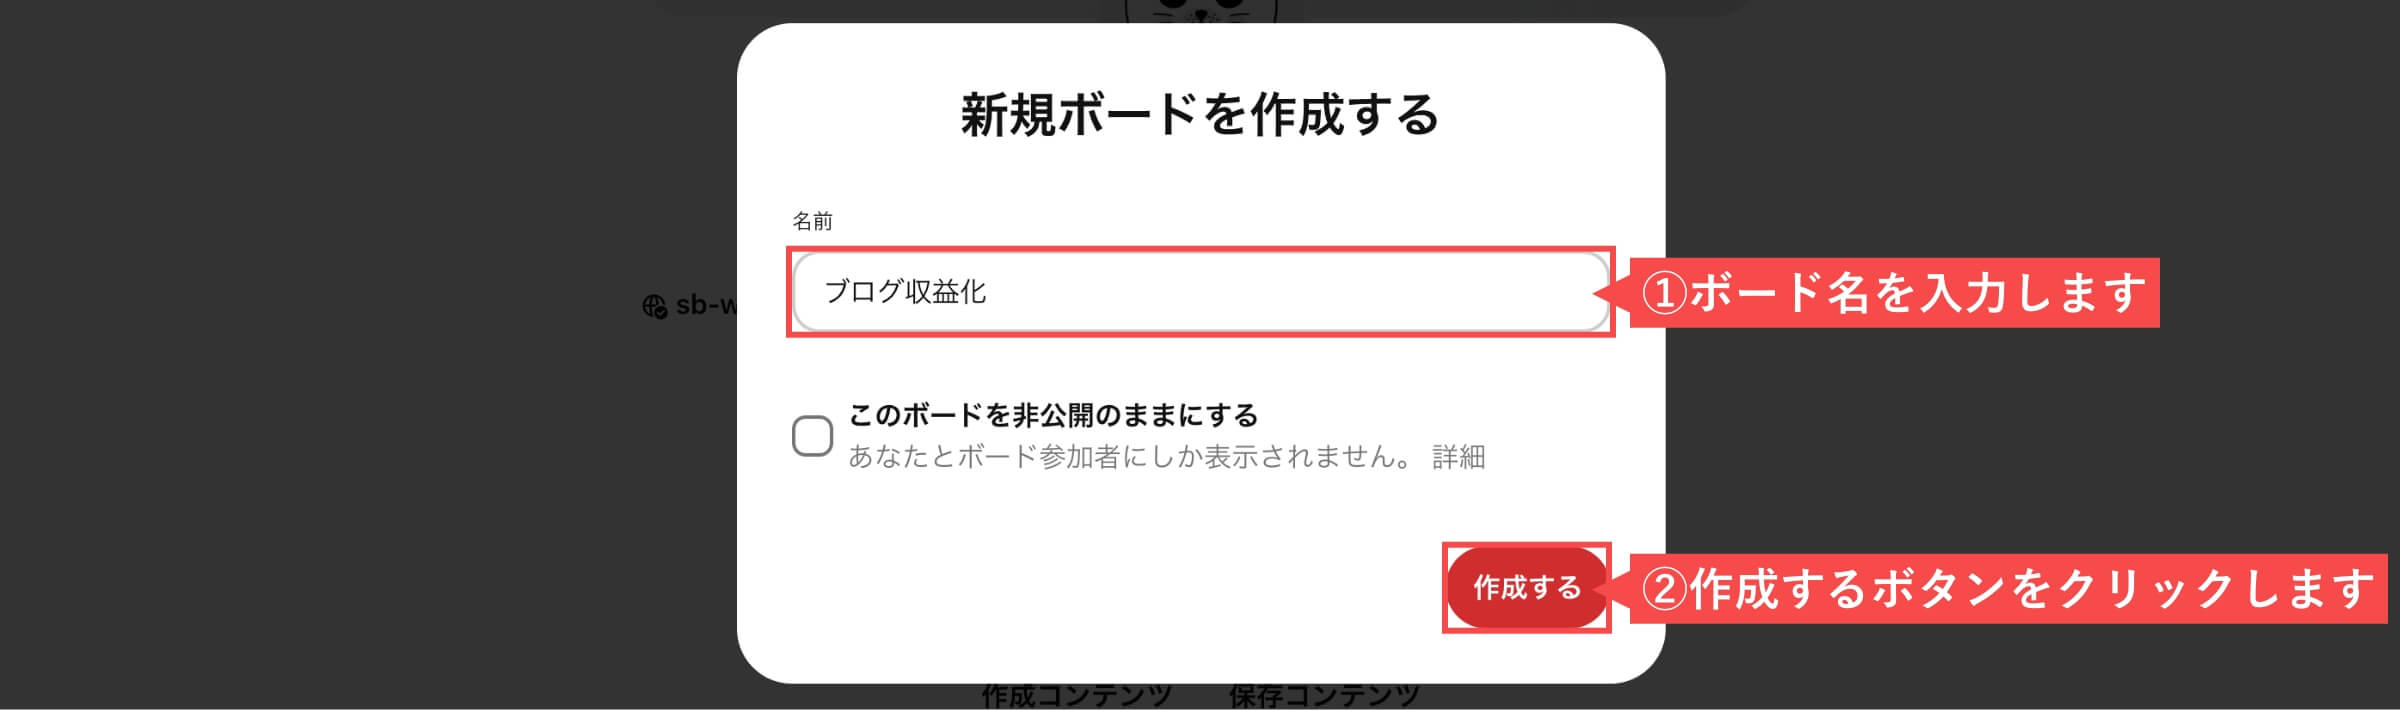
- 「ボード名」を入力します。
- 「作成する」ボタンをクリックします。
- 「完了」ボタンをクリックします。
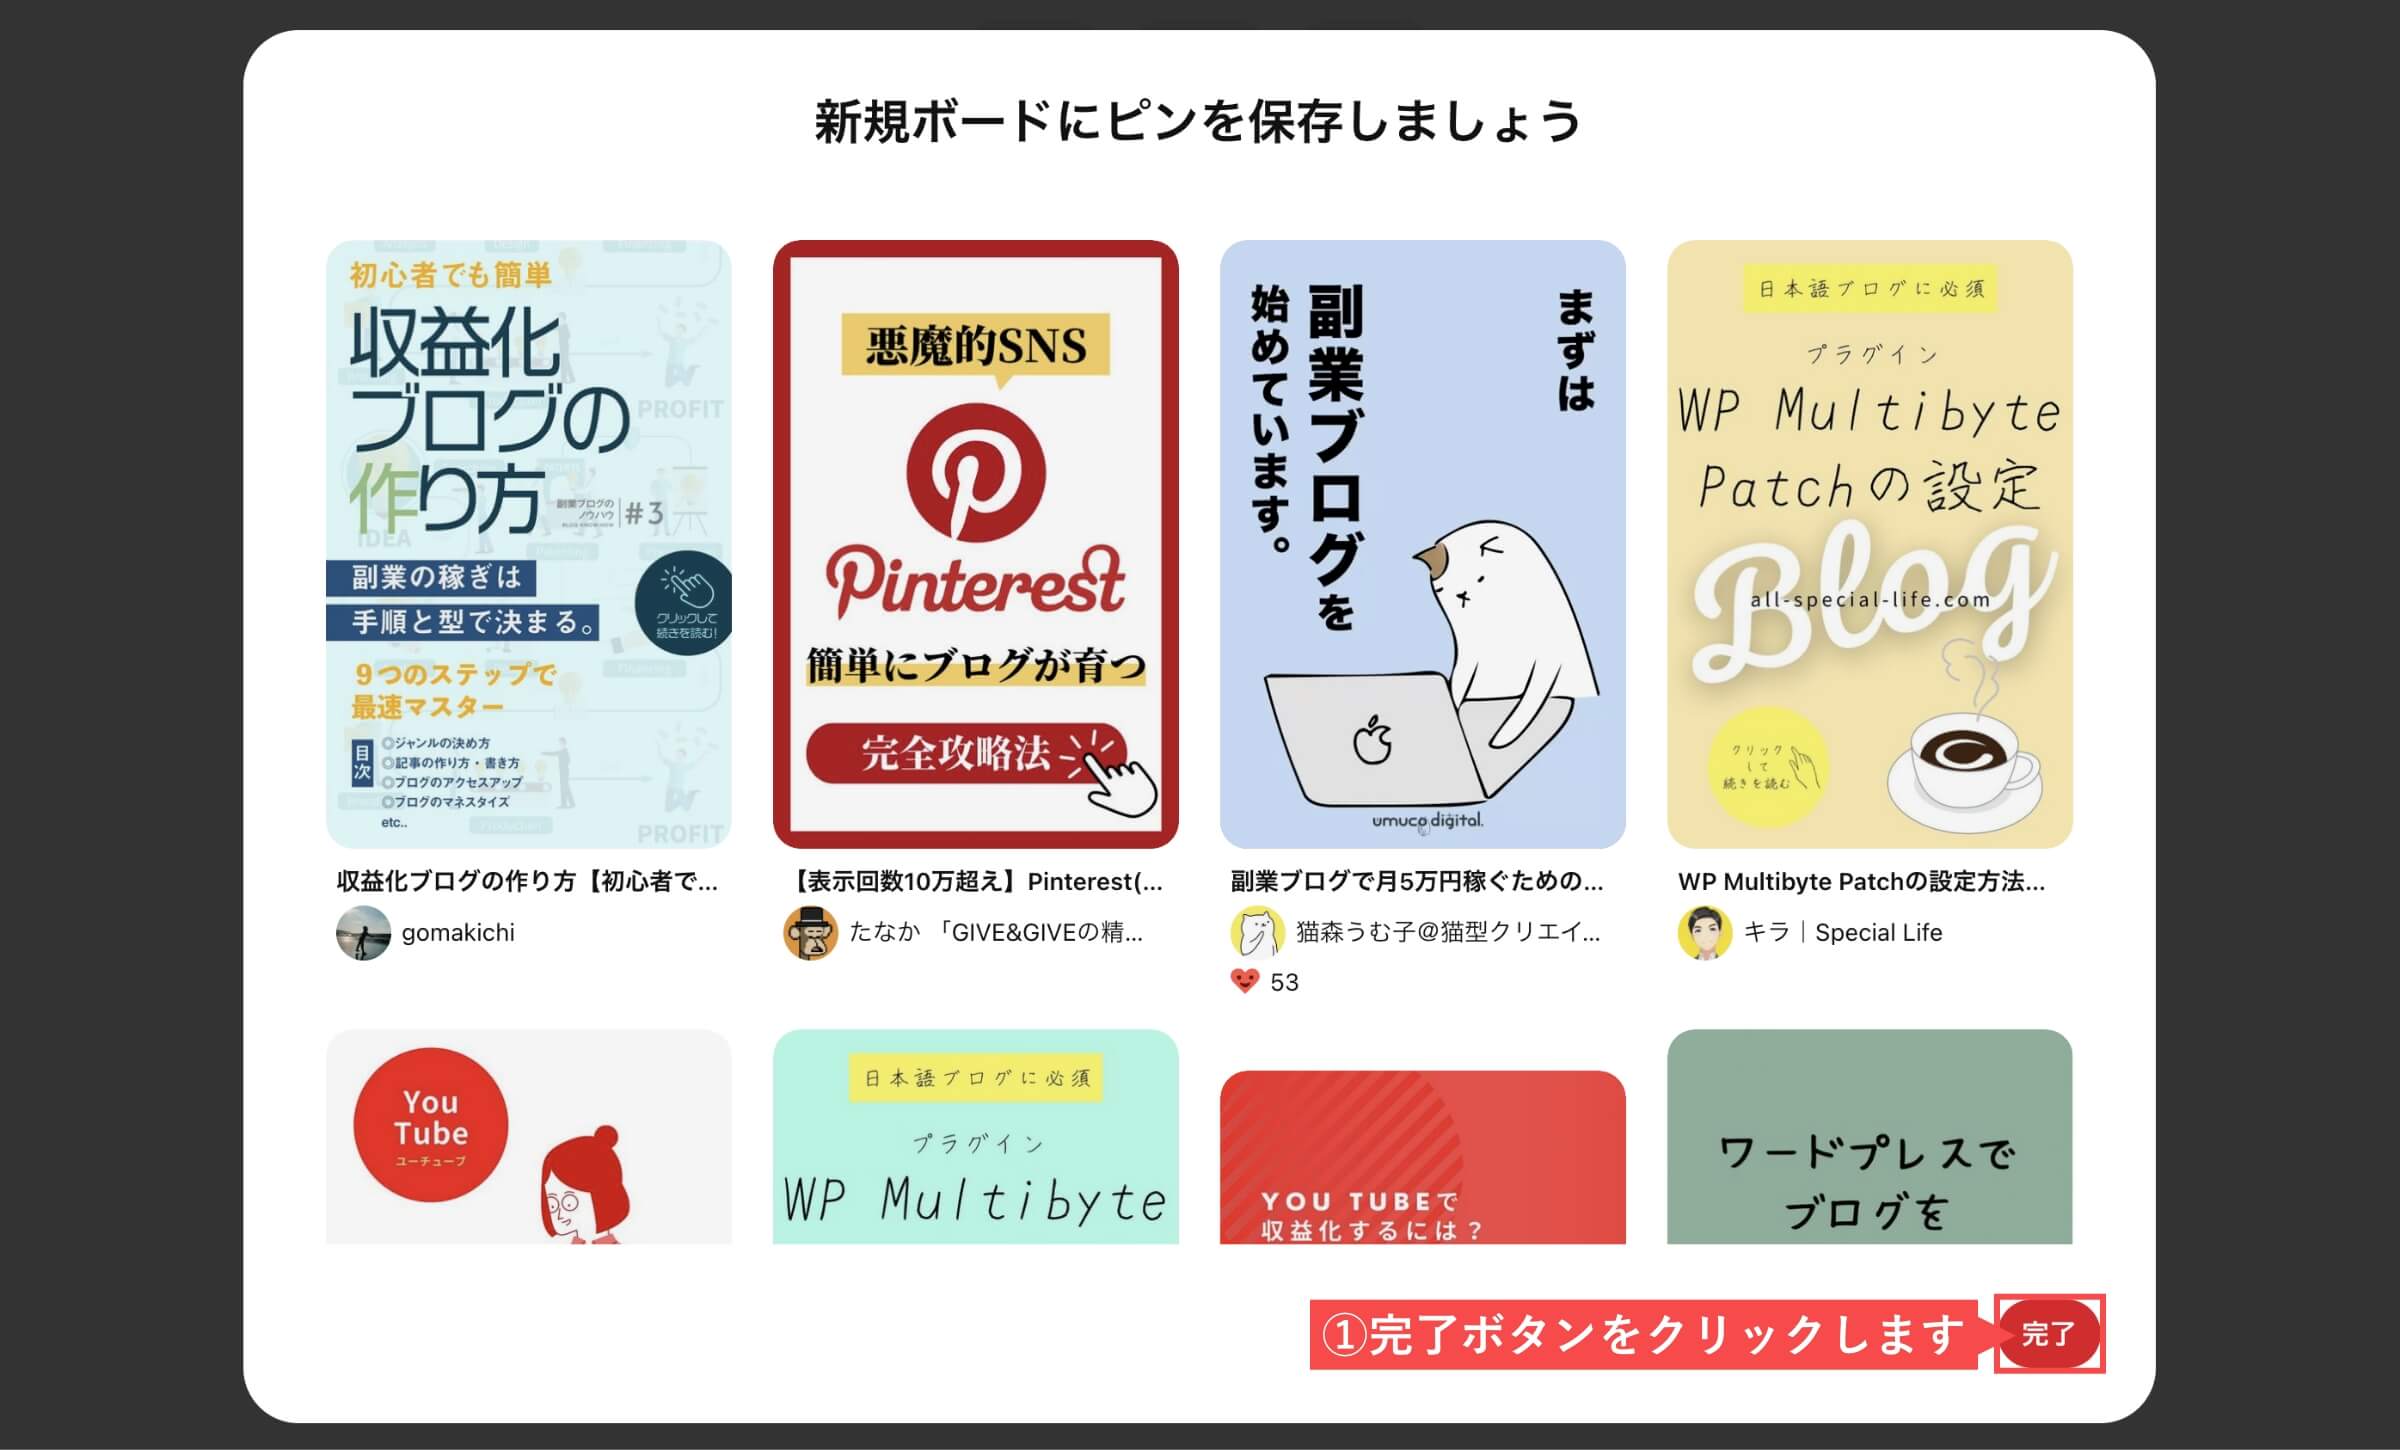

「ボードを作成する」の解説は以上です。
ボードカバーを設定する
ボードを作成したら、必ずボードカバーを設定するようにしましょう。
ボードカバーを設定しておくことで、ボードのカテゴリが何なのかを画像で表示することができます。
Pinterestのアカウントページから解説します。
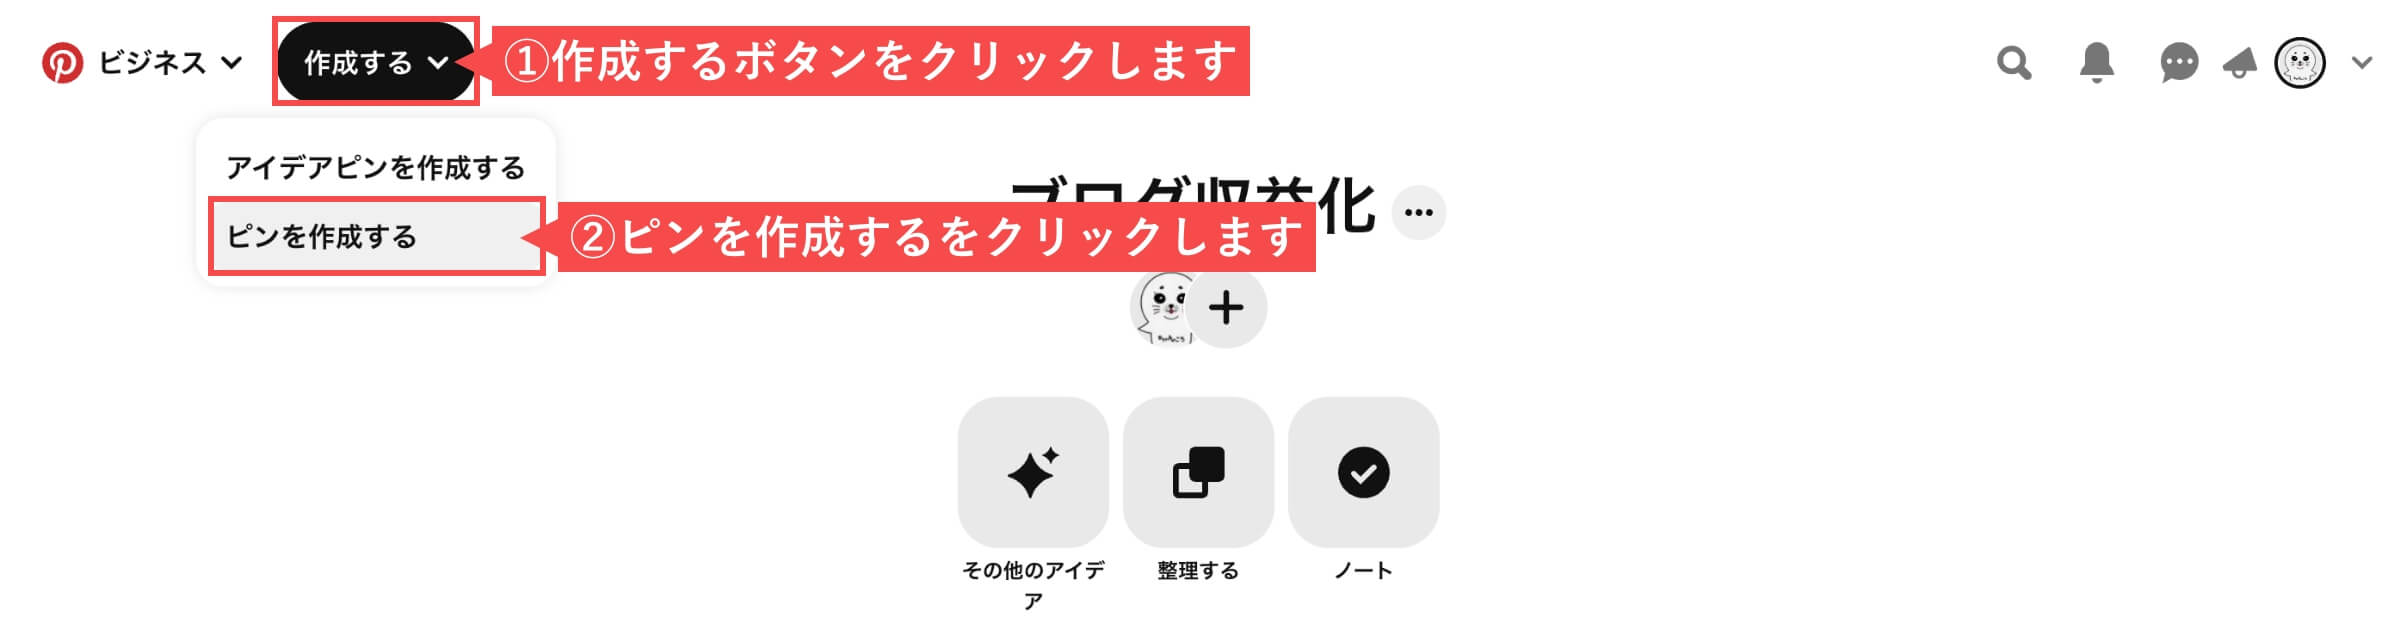
- 「作成する」ボタンをクリックします。
- 「ピンを作成する」をクリックします。
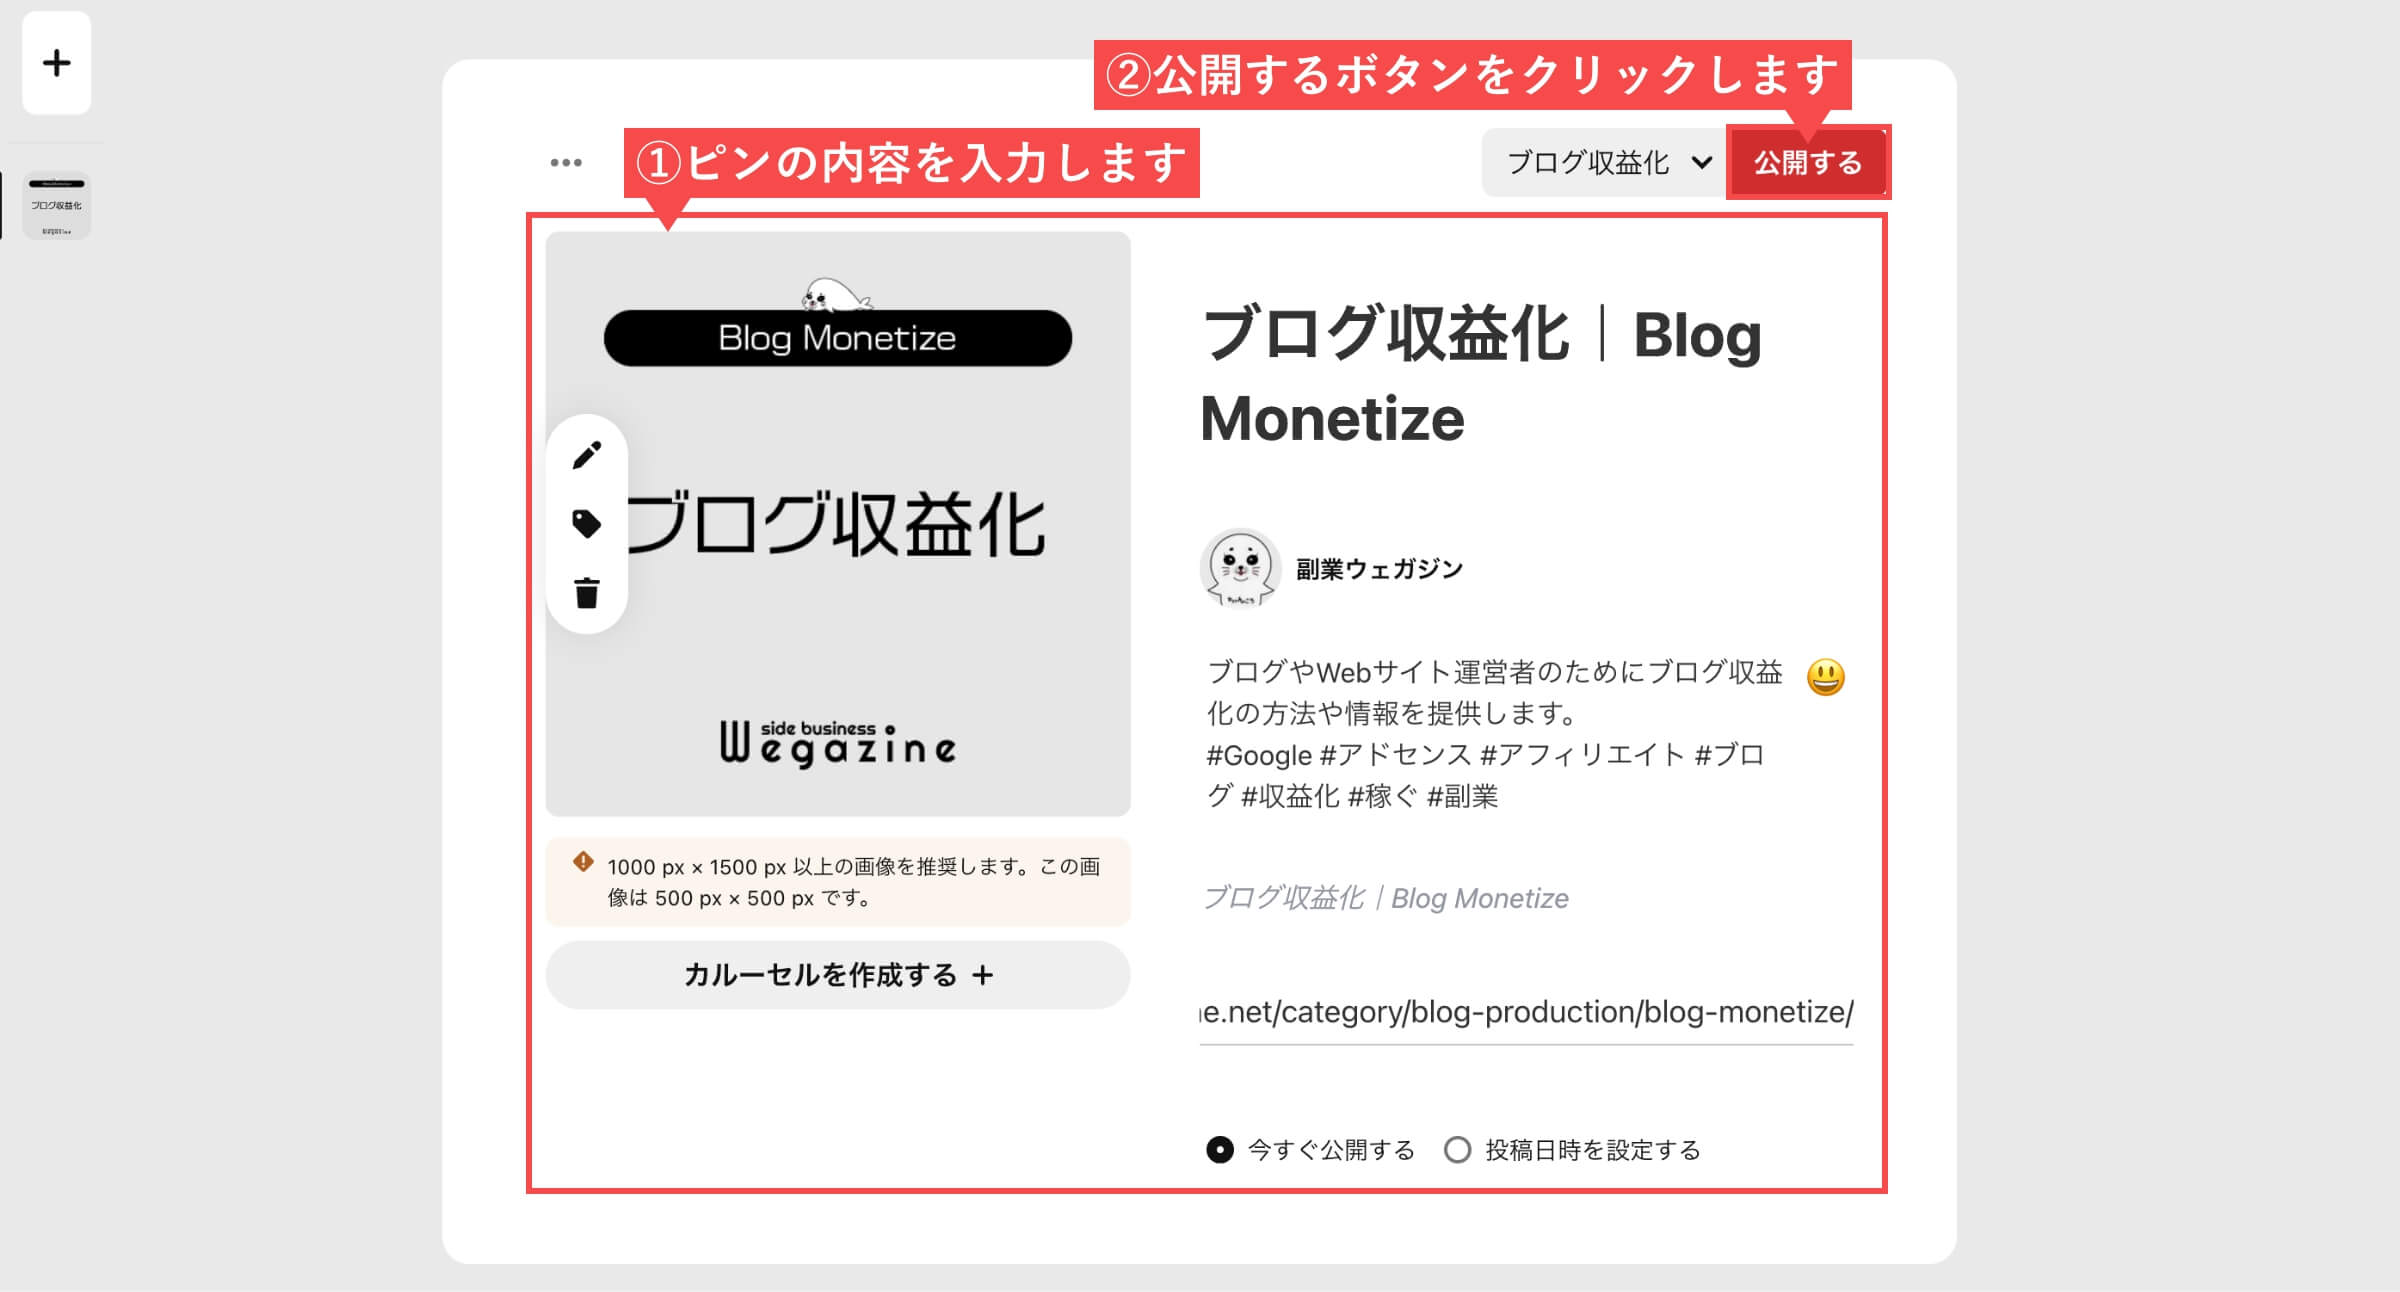
- 「ピンの内容」を入力します。
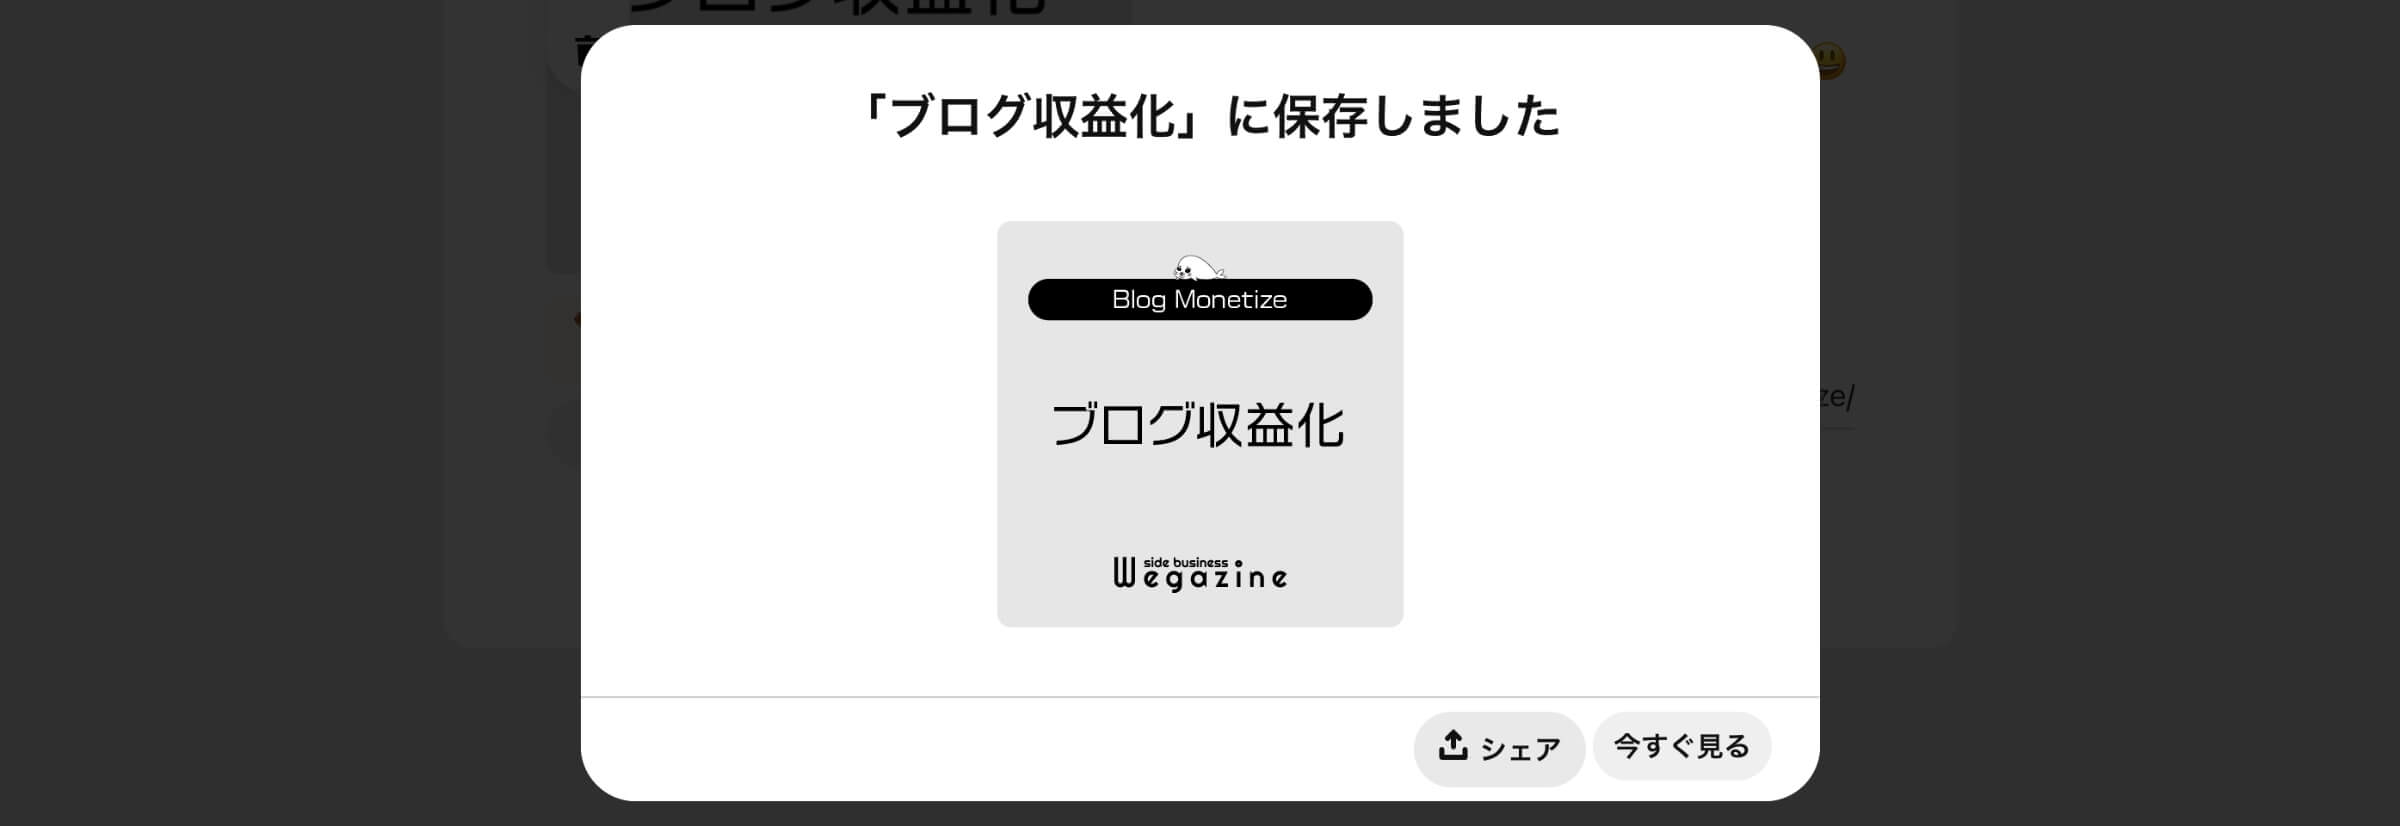
- 登録ボードを確認して「公開する」ボタンをクリックします。
- 画像を登録します(オススメサイズは500px × 500pxです)
- ボード名と同じタイトルを入力します
- 説明文を入力します(ハッシュタグで関連タグも入力します)
- 代替テキストはタイトルと同じ内容を入力します
- ブログへのリンク先URLを入力します(カテゴリ一覧ページ)
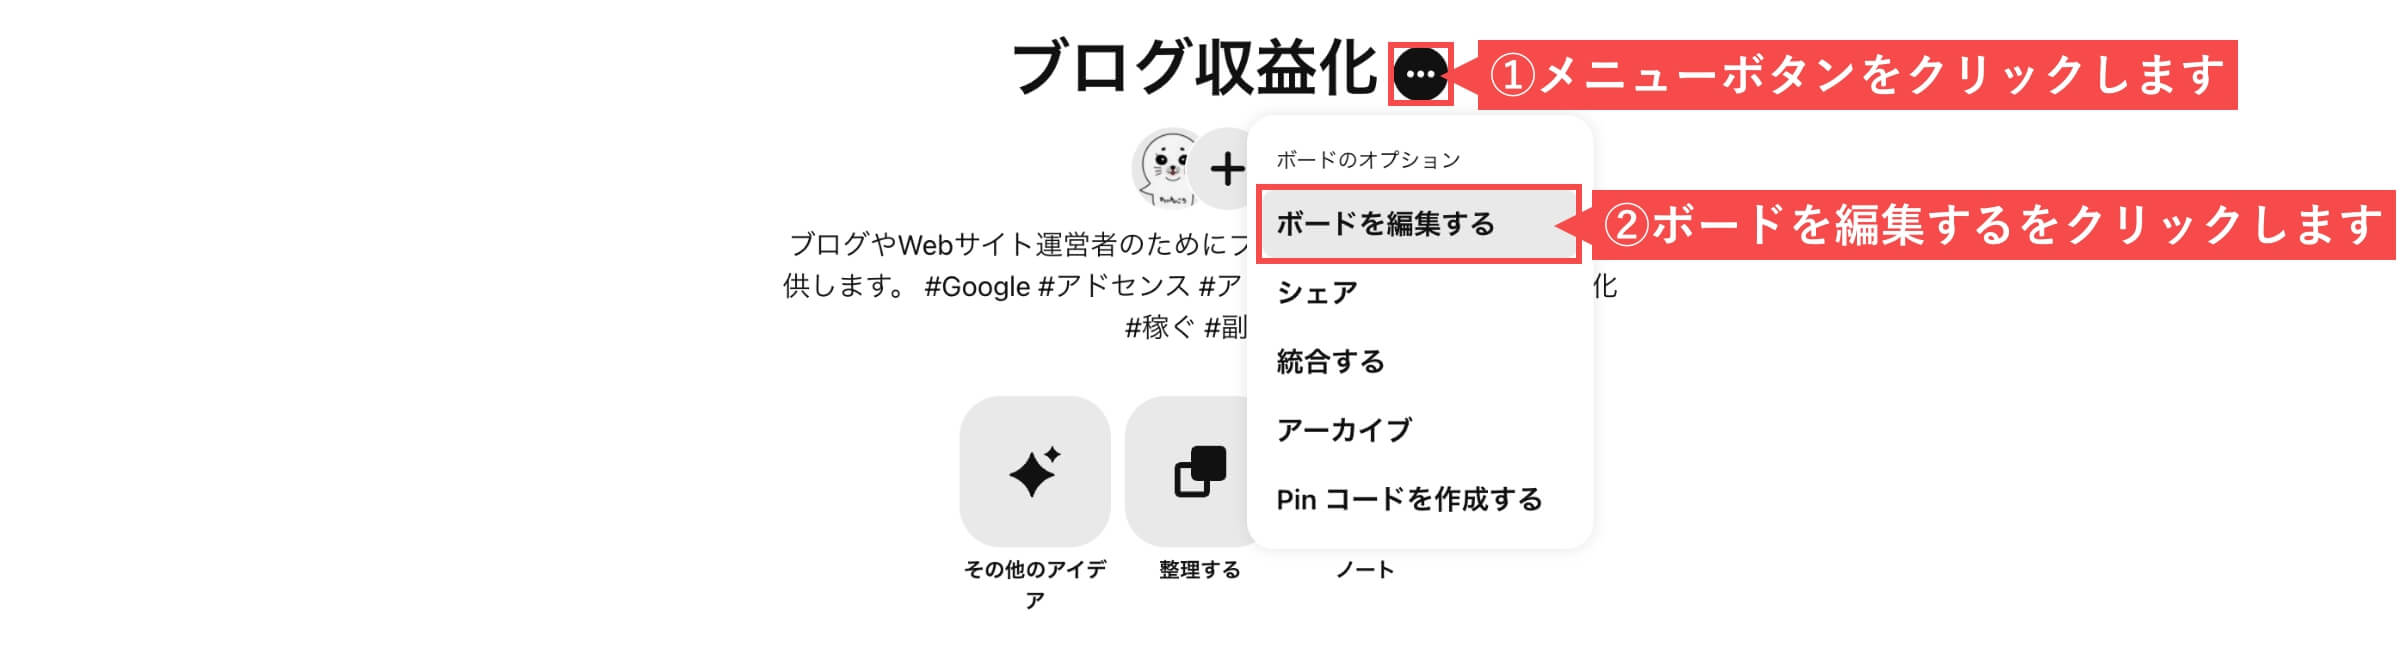
- 「メニュー」ボタンをクリックします。
- 「ボードを編集する」をクリックします。
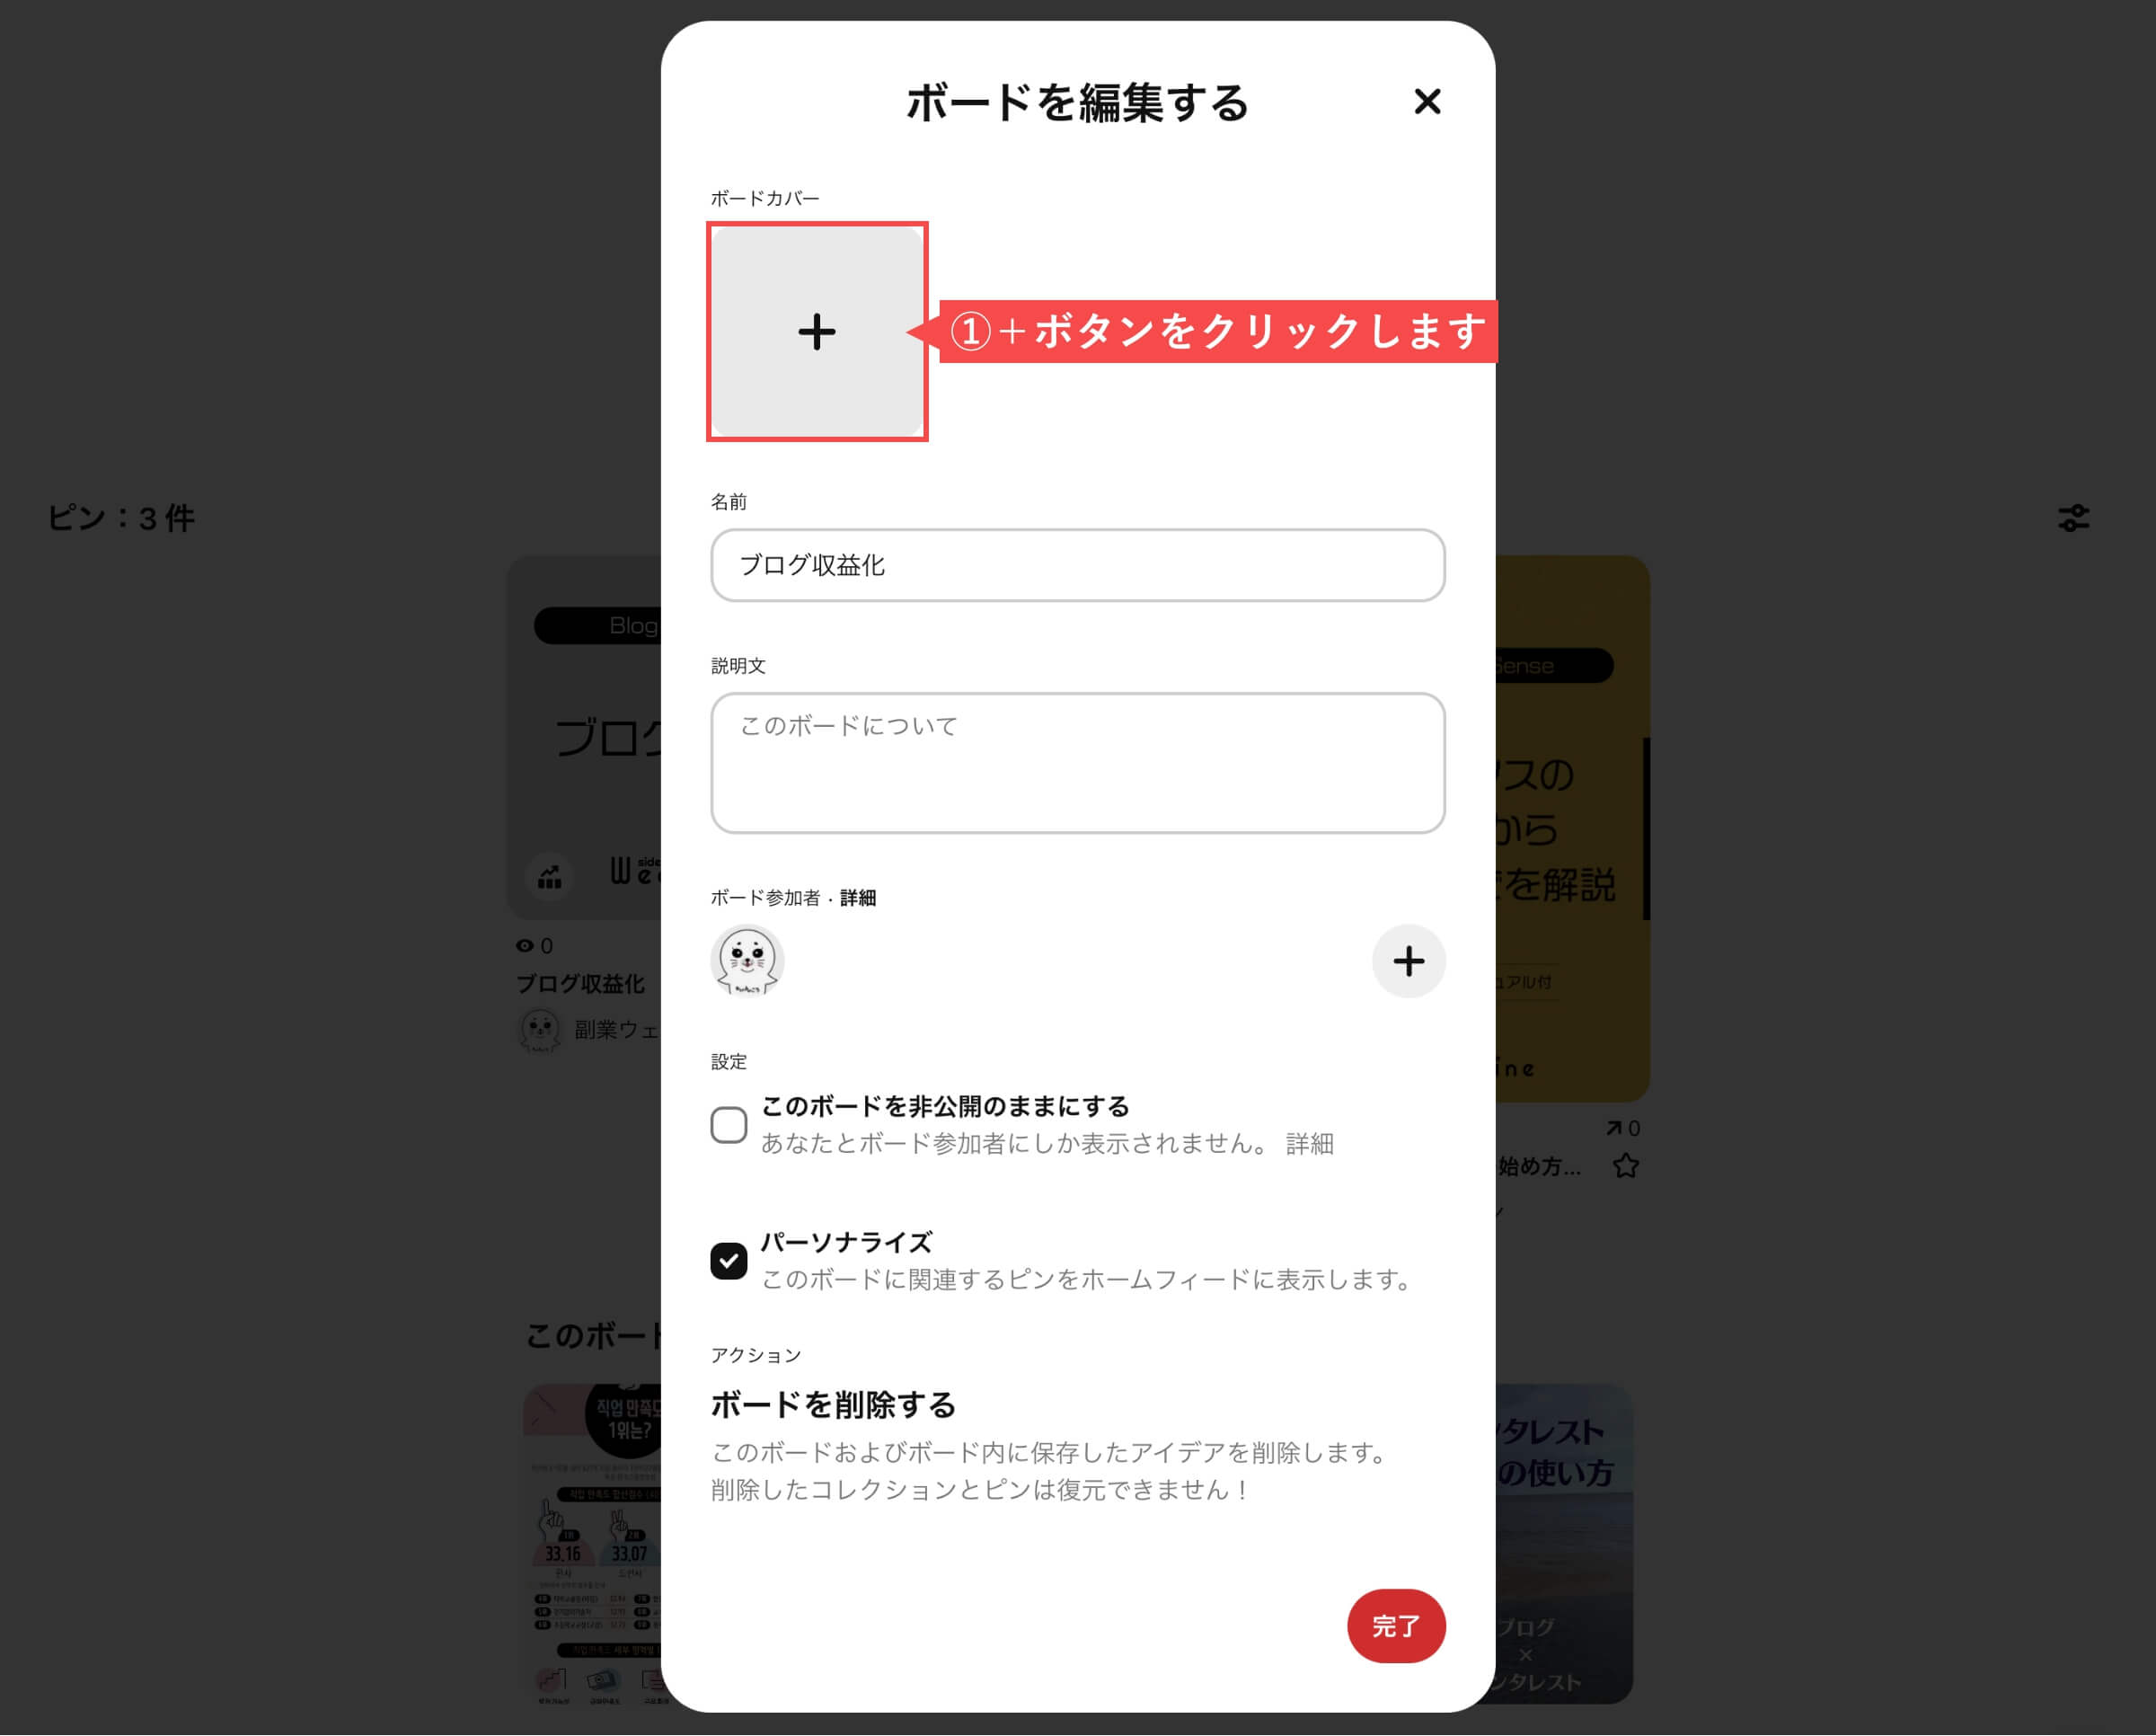
- ボードカバーの「+(プラス)」ボタンをクリックします。
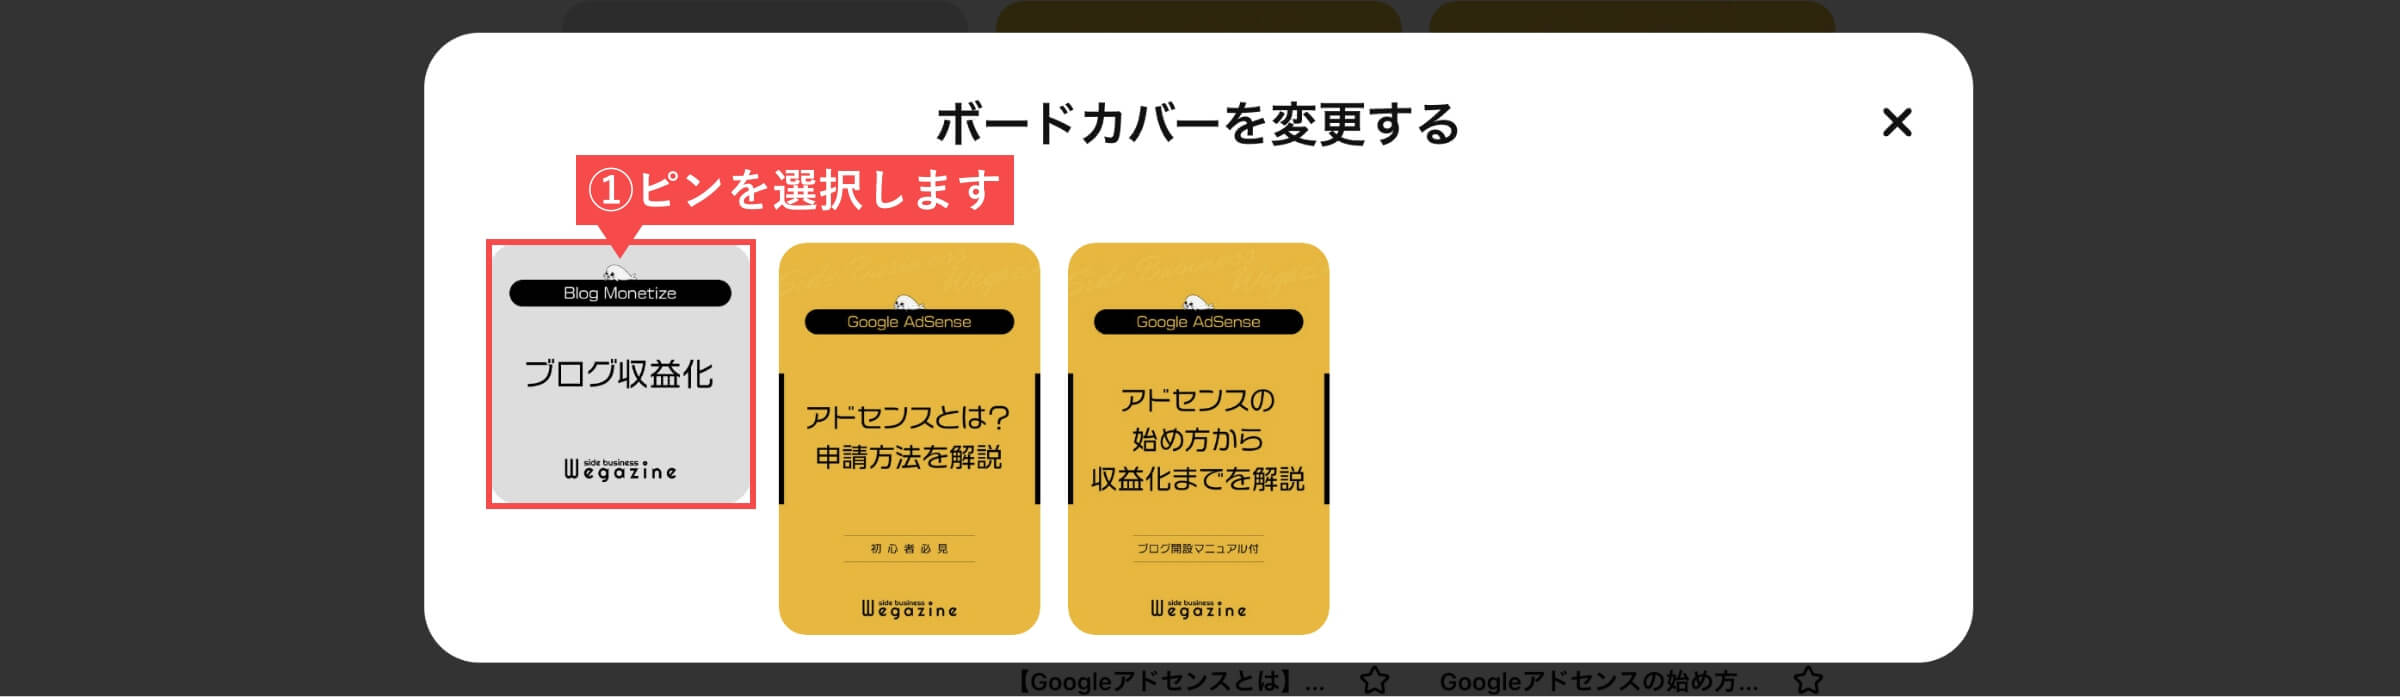
- ボードカバー用の「ピン」を選択します。
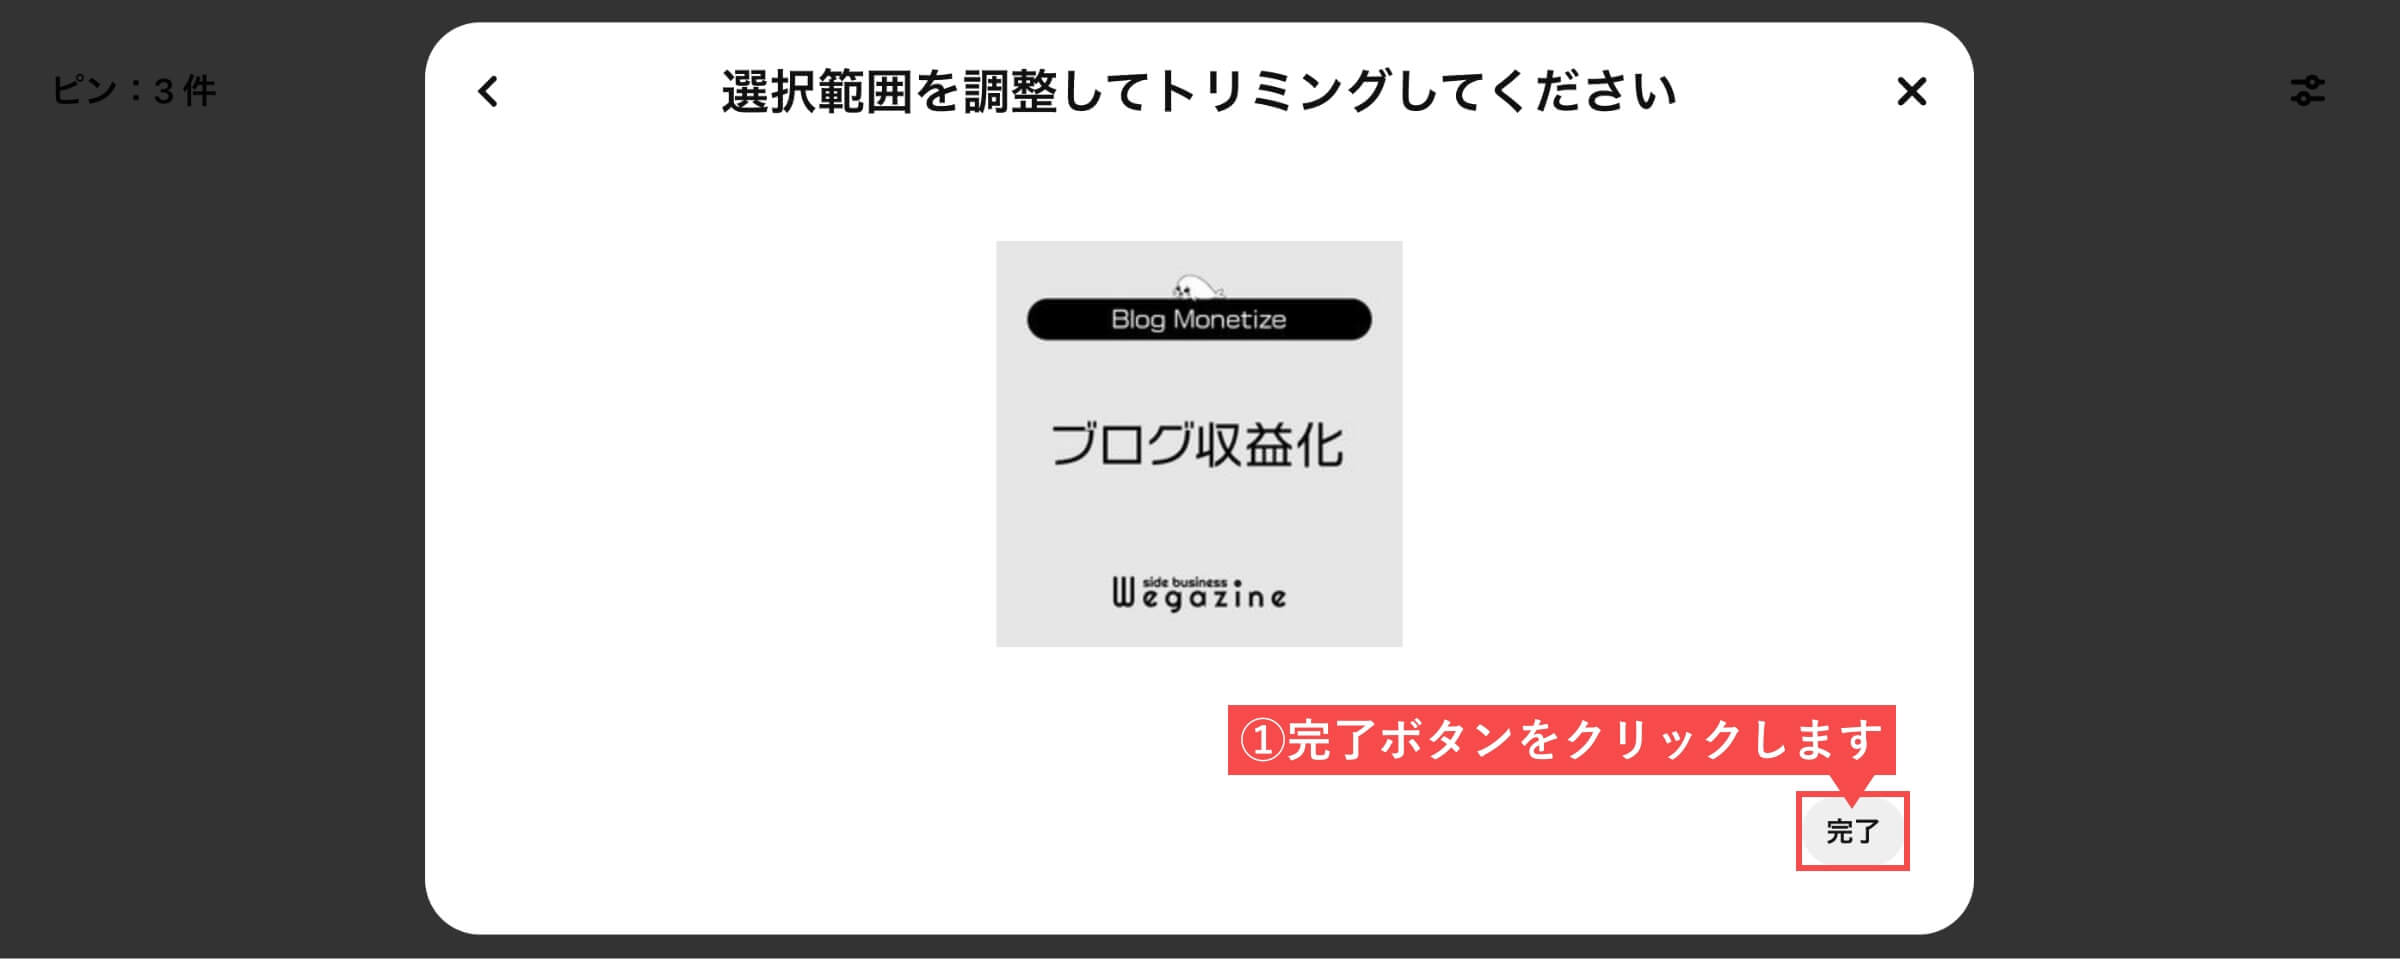
- 「完了」ボタンをクリックします。
- 「説明文」を入力します。
- 「完了」ボタンをクリックします。
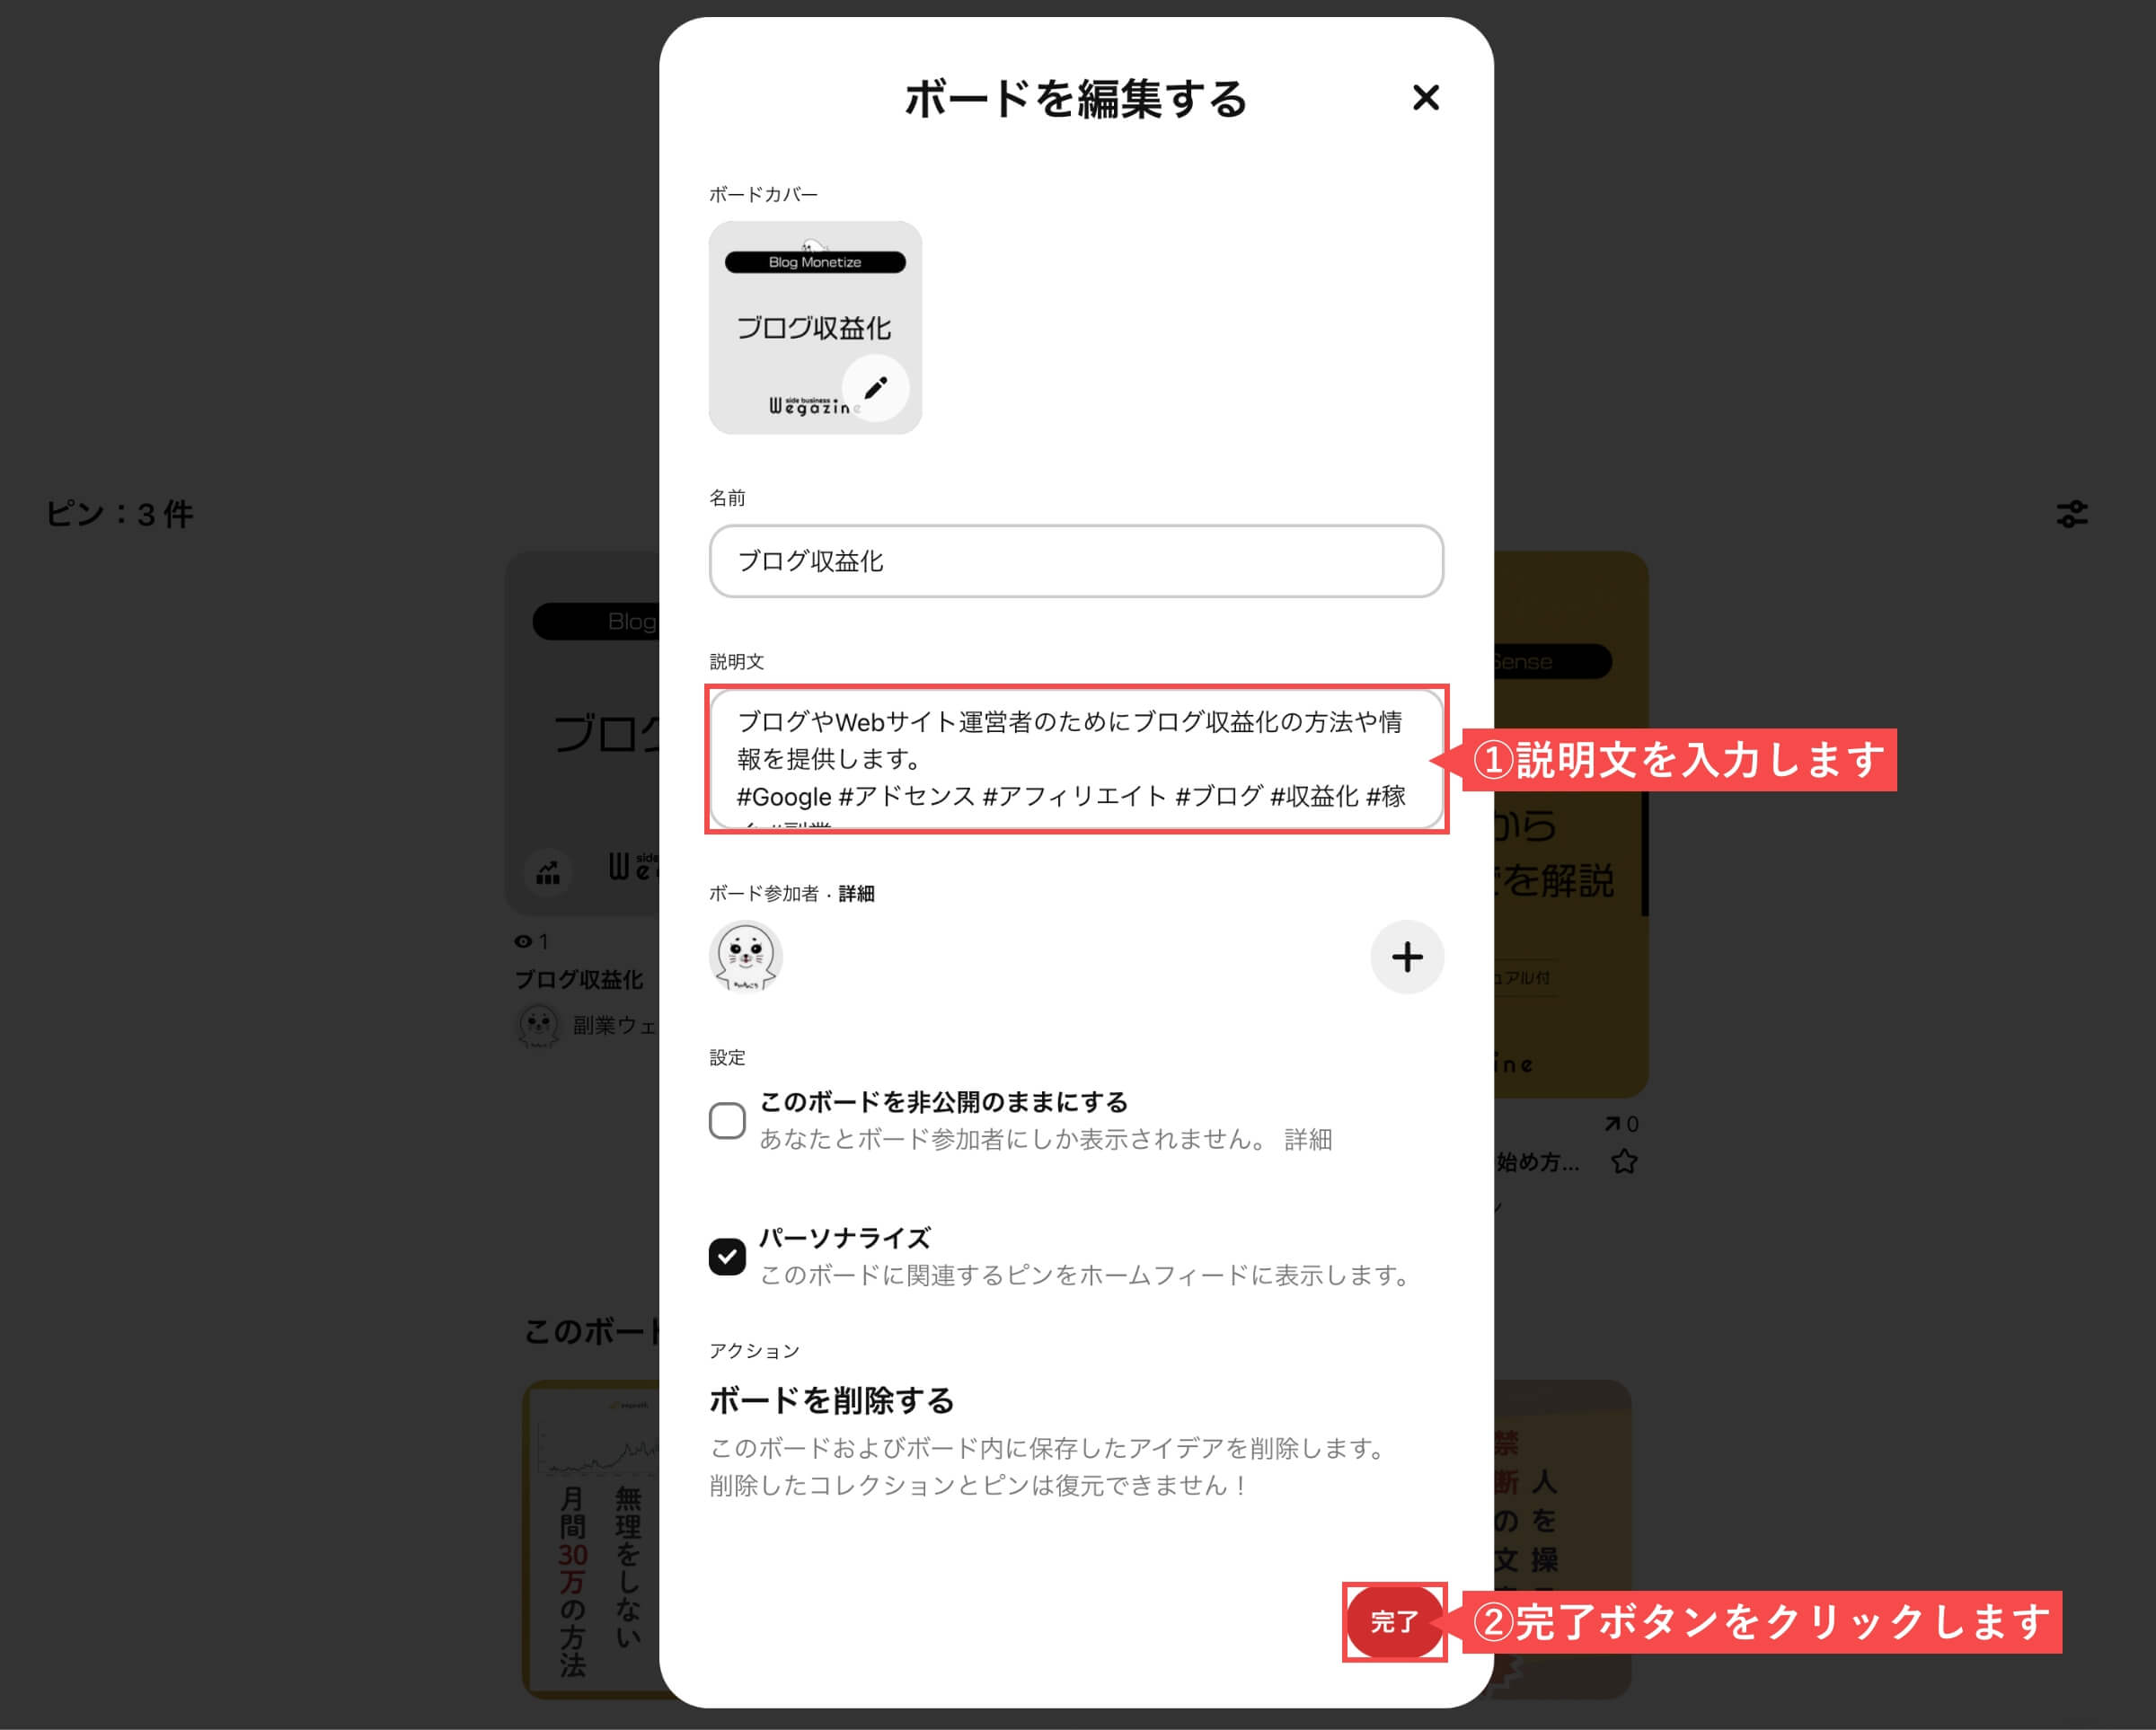

「ボードカバーを設定する」の解説は以上です。
サブボードを作成する
サブボードは、Pinterestの検索で表示されないので、特別な理由がない限りは利用をオススメしません。
Pinterestのアカウントページから解説します。
- 「+(プラス)」ボタンをクリックします。
- 「サブボード」をクリックします。
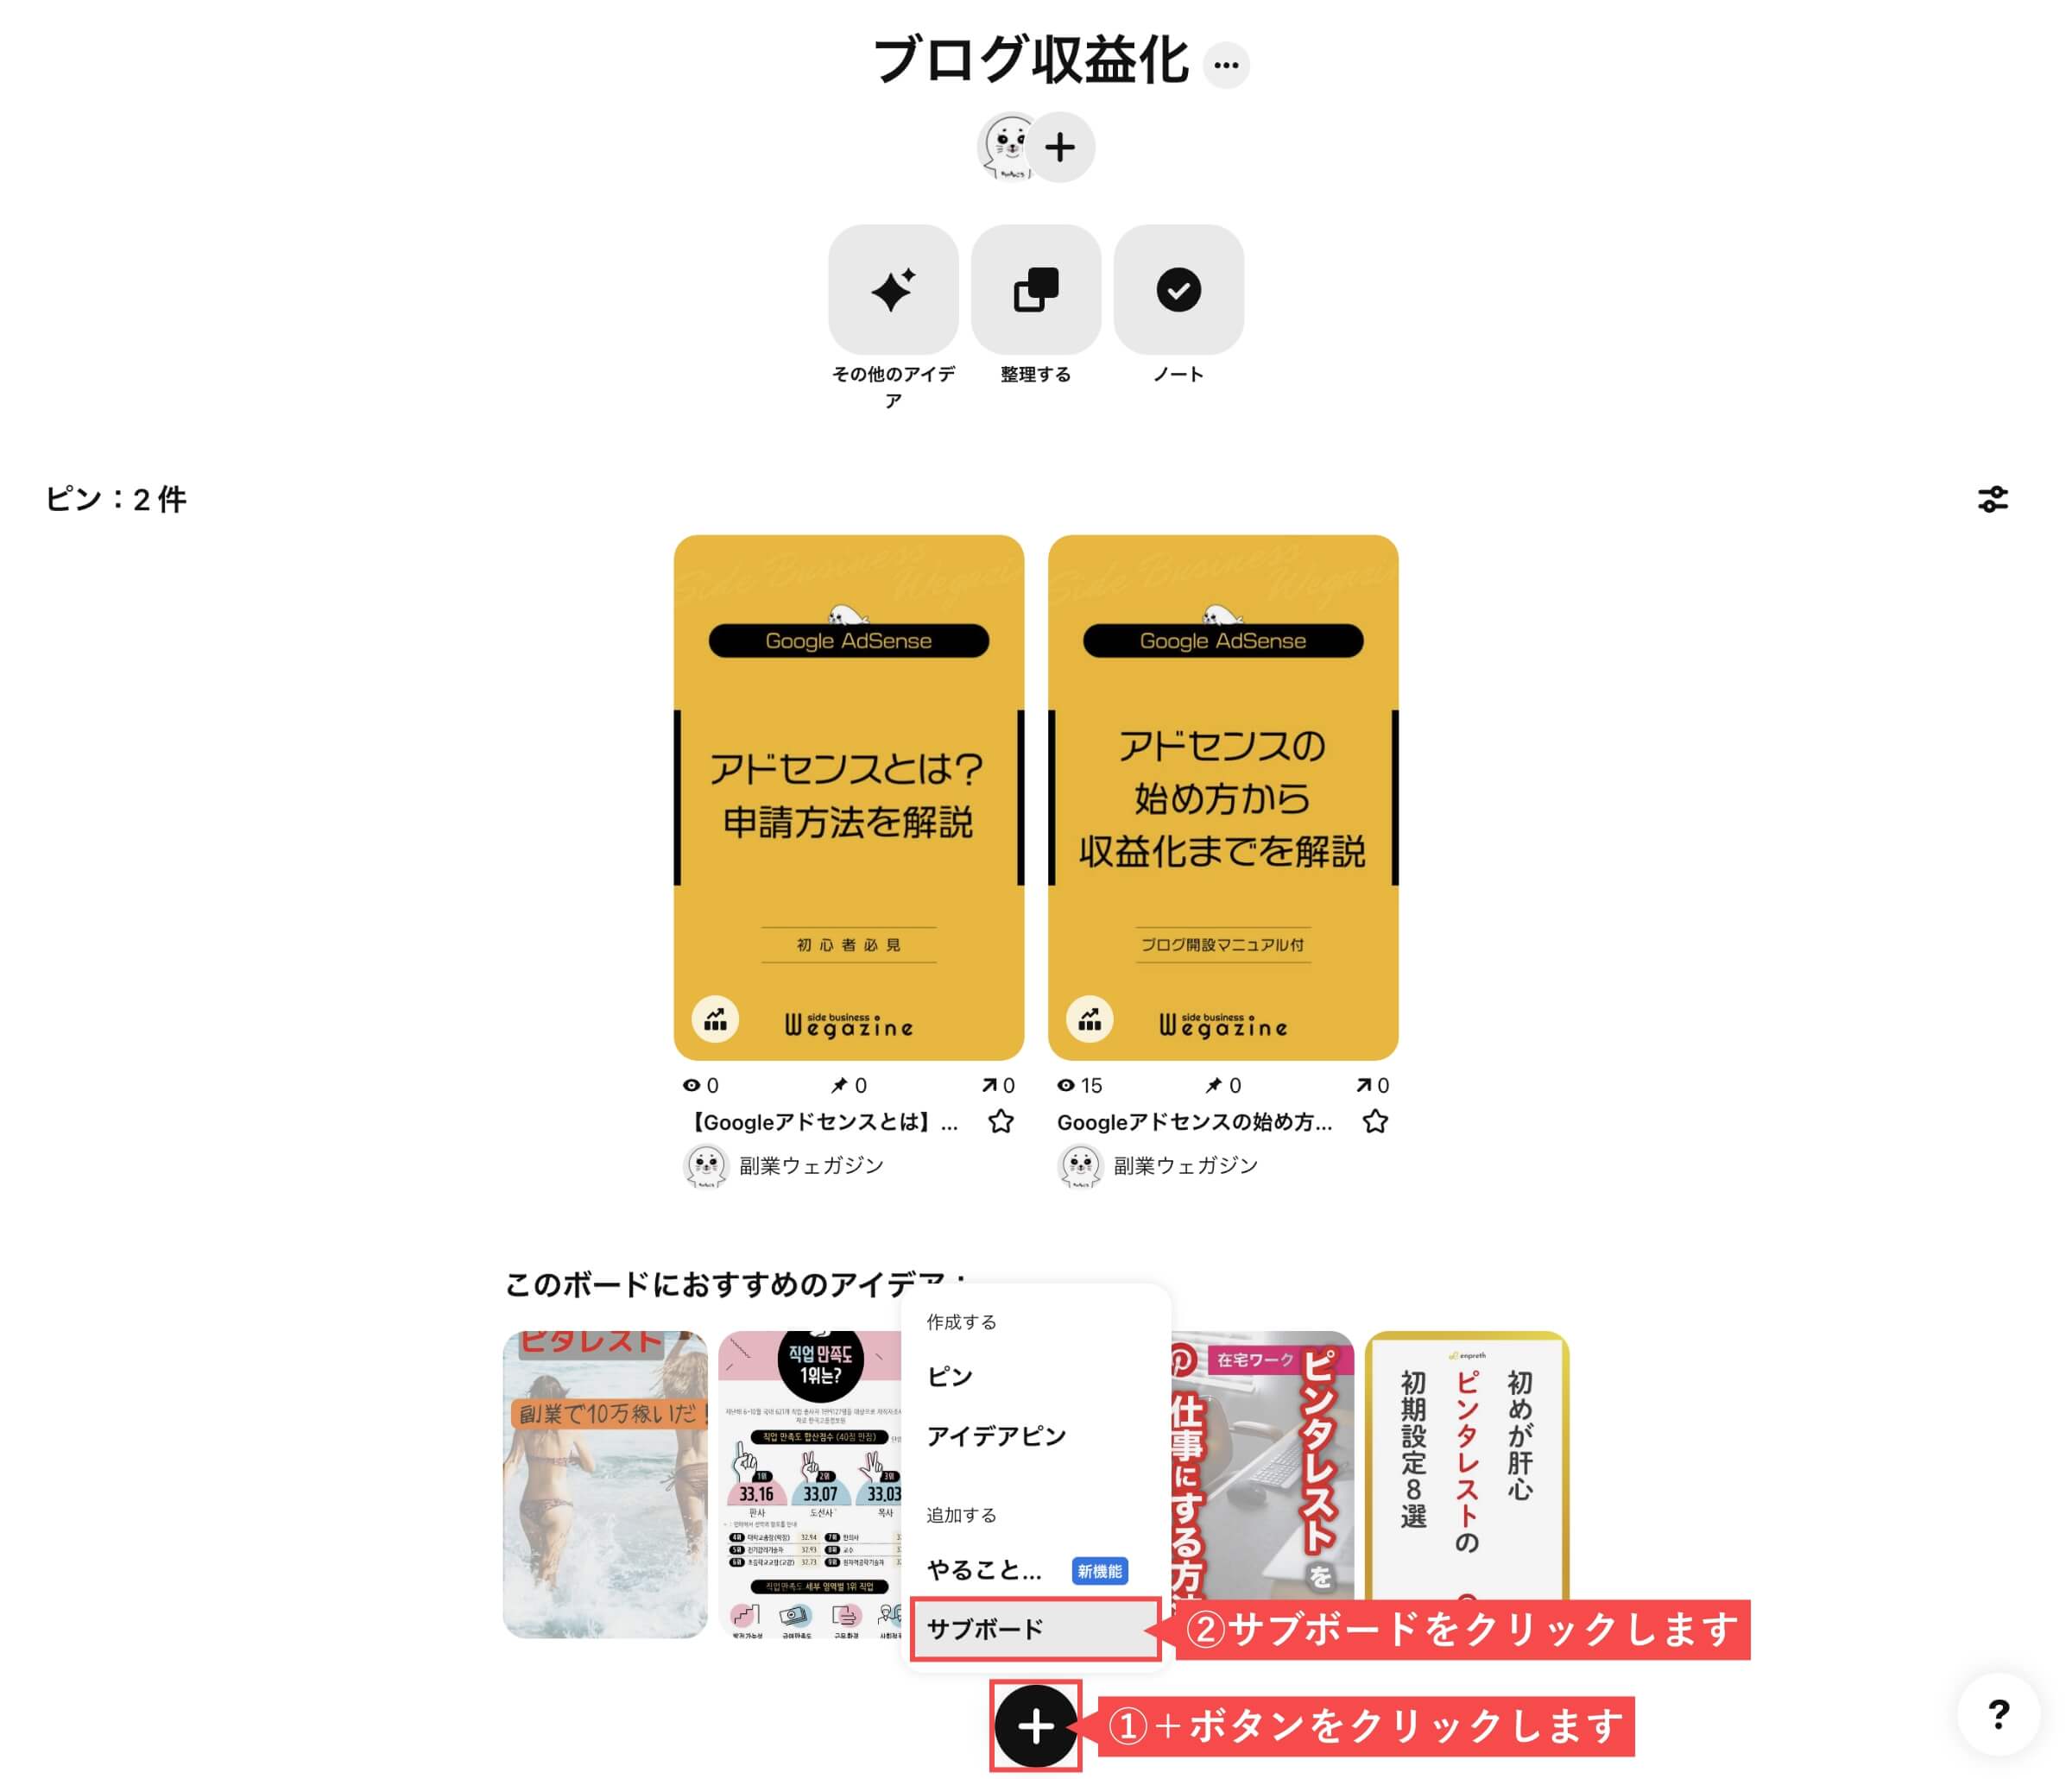
- 「サブボード名」を入力します。
- 「追加ボタン」をクリックします。


「サブボードを作成する」の解説は以上です。
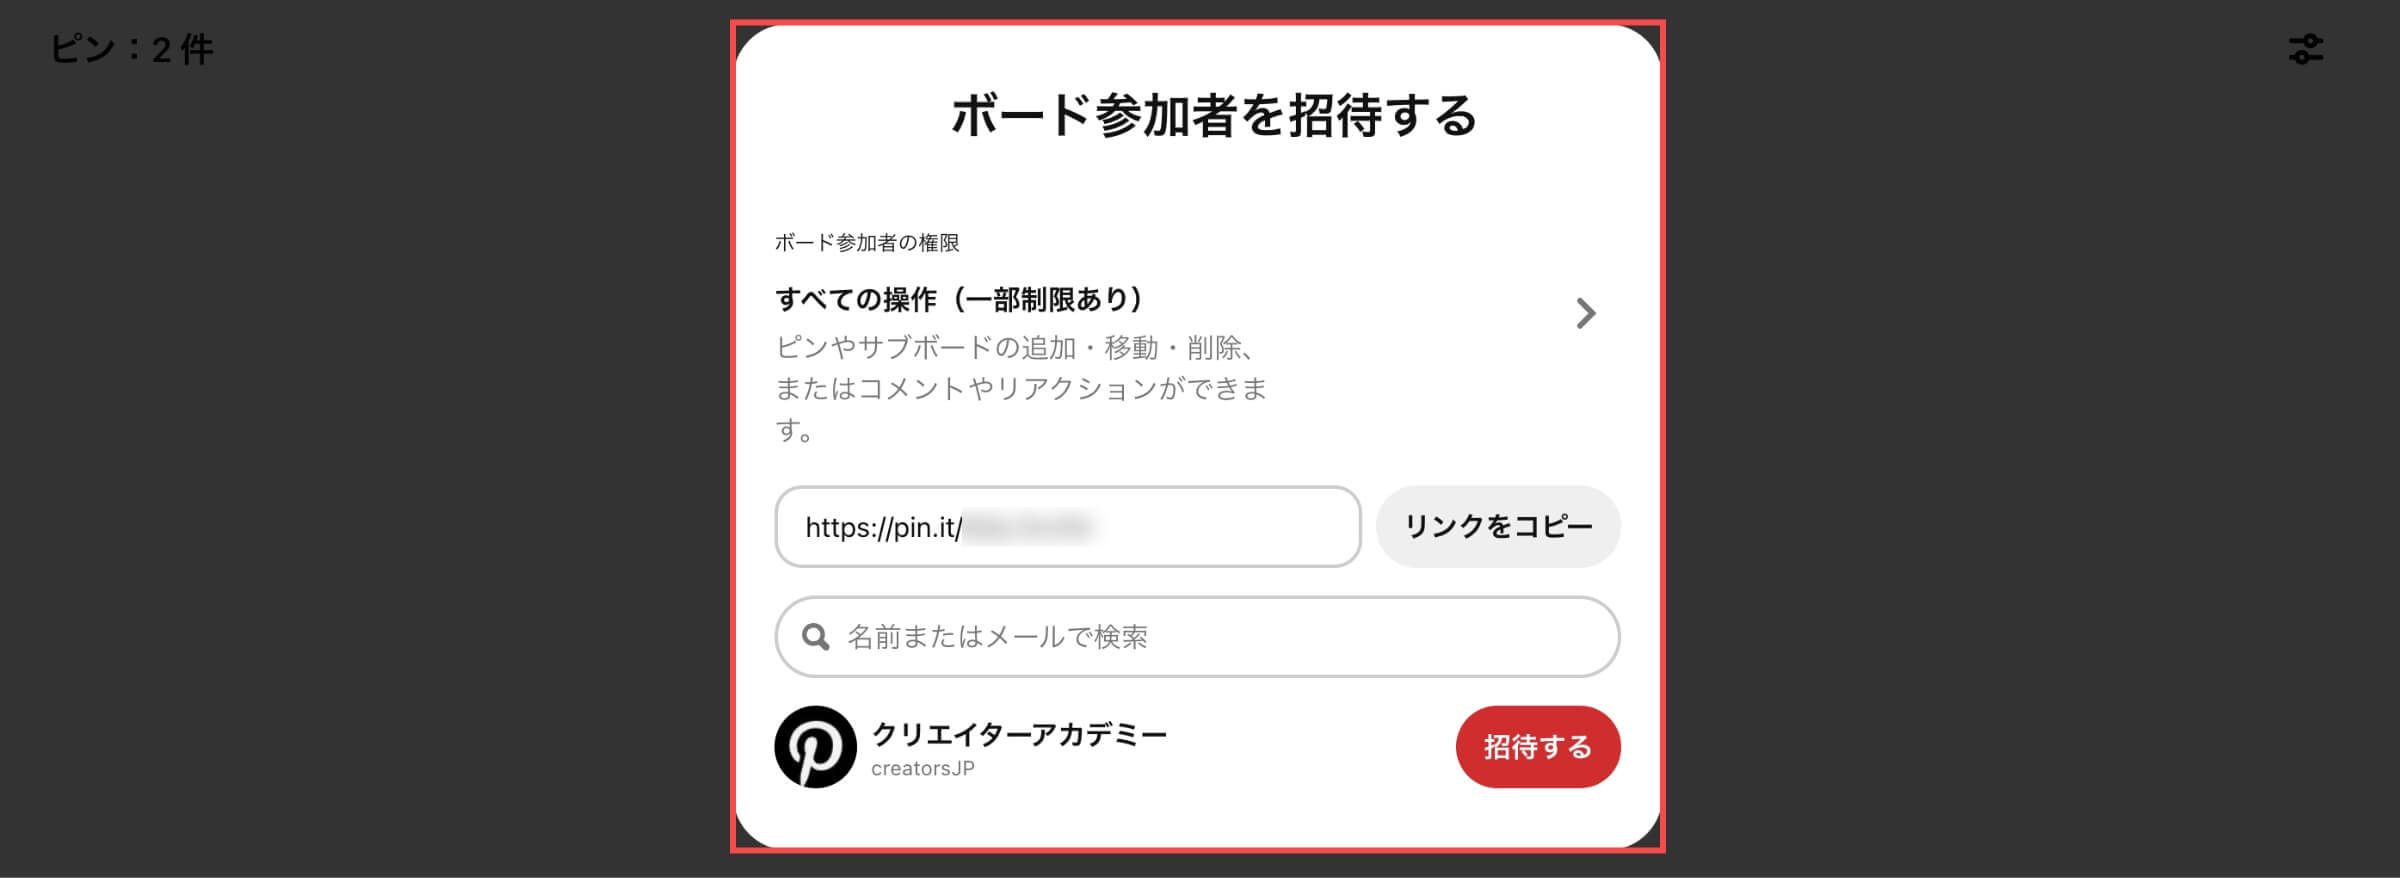
グループボードを作成する
Pinterestのアカウントページから解説します。
- アイコン横の「+(プラス)」ボタンをクリックします。

- リンクを共有して招待する
- 名前または、メールアドレスで検索して招待する
- フォローしているアカウントを招待する
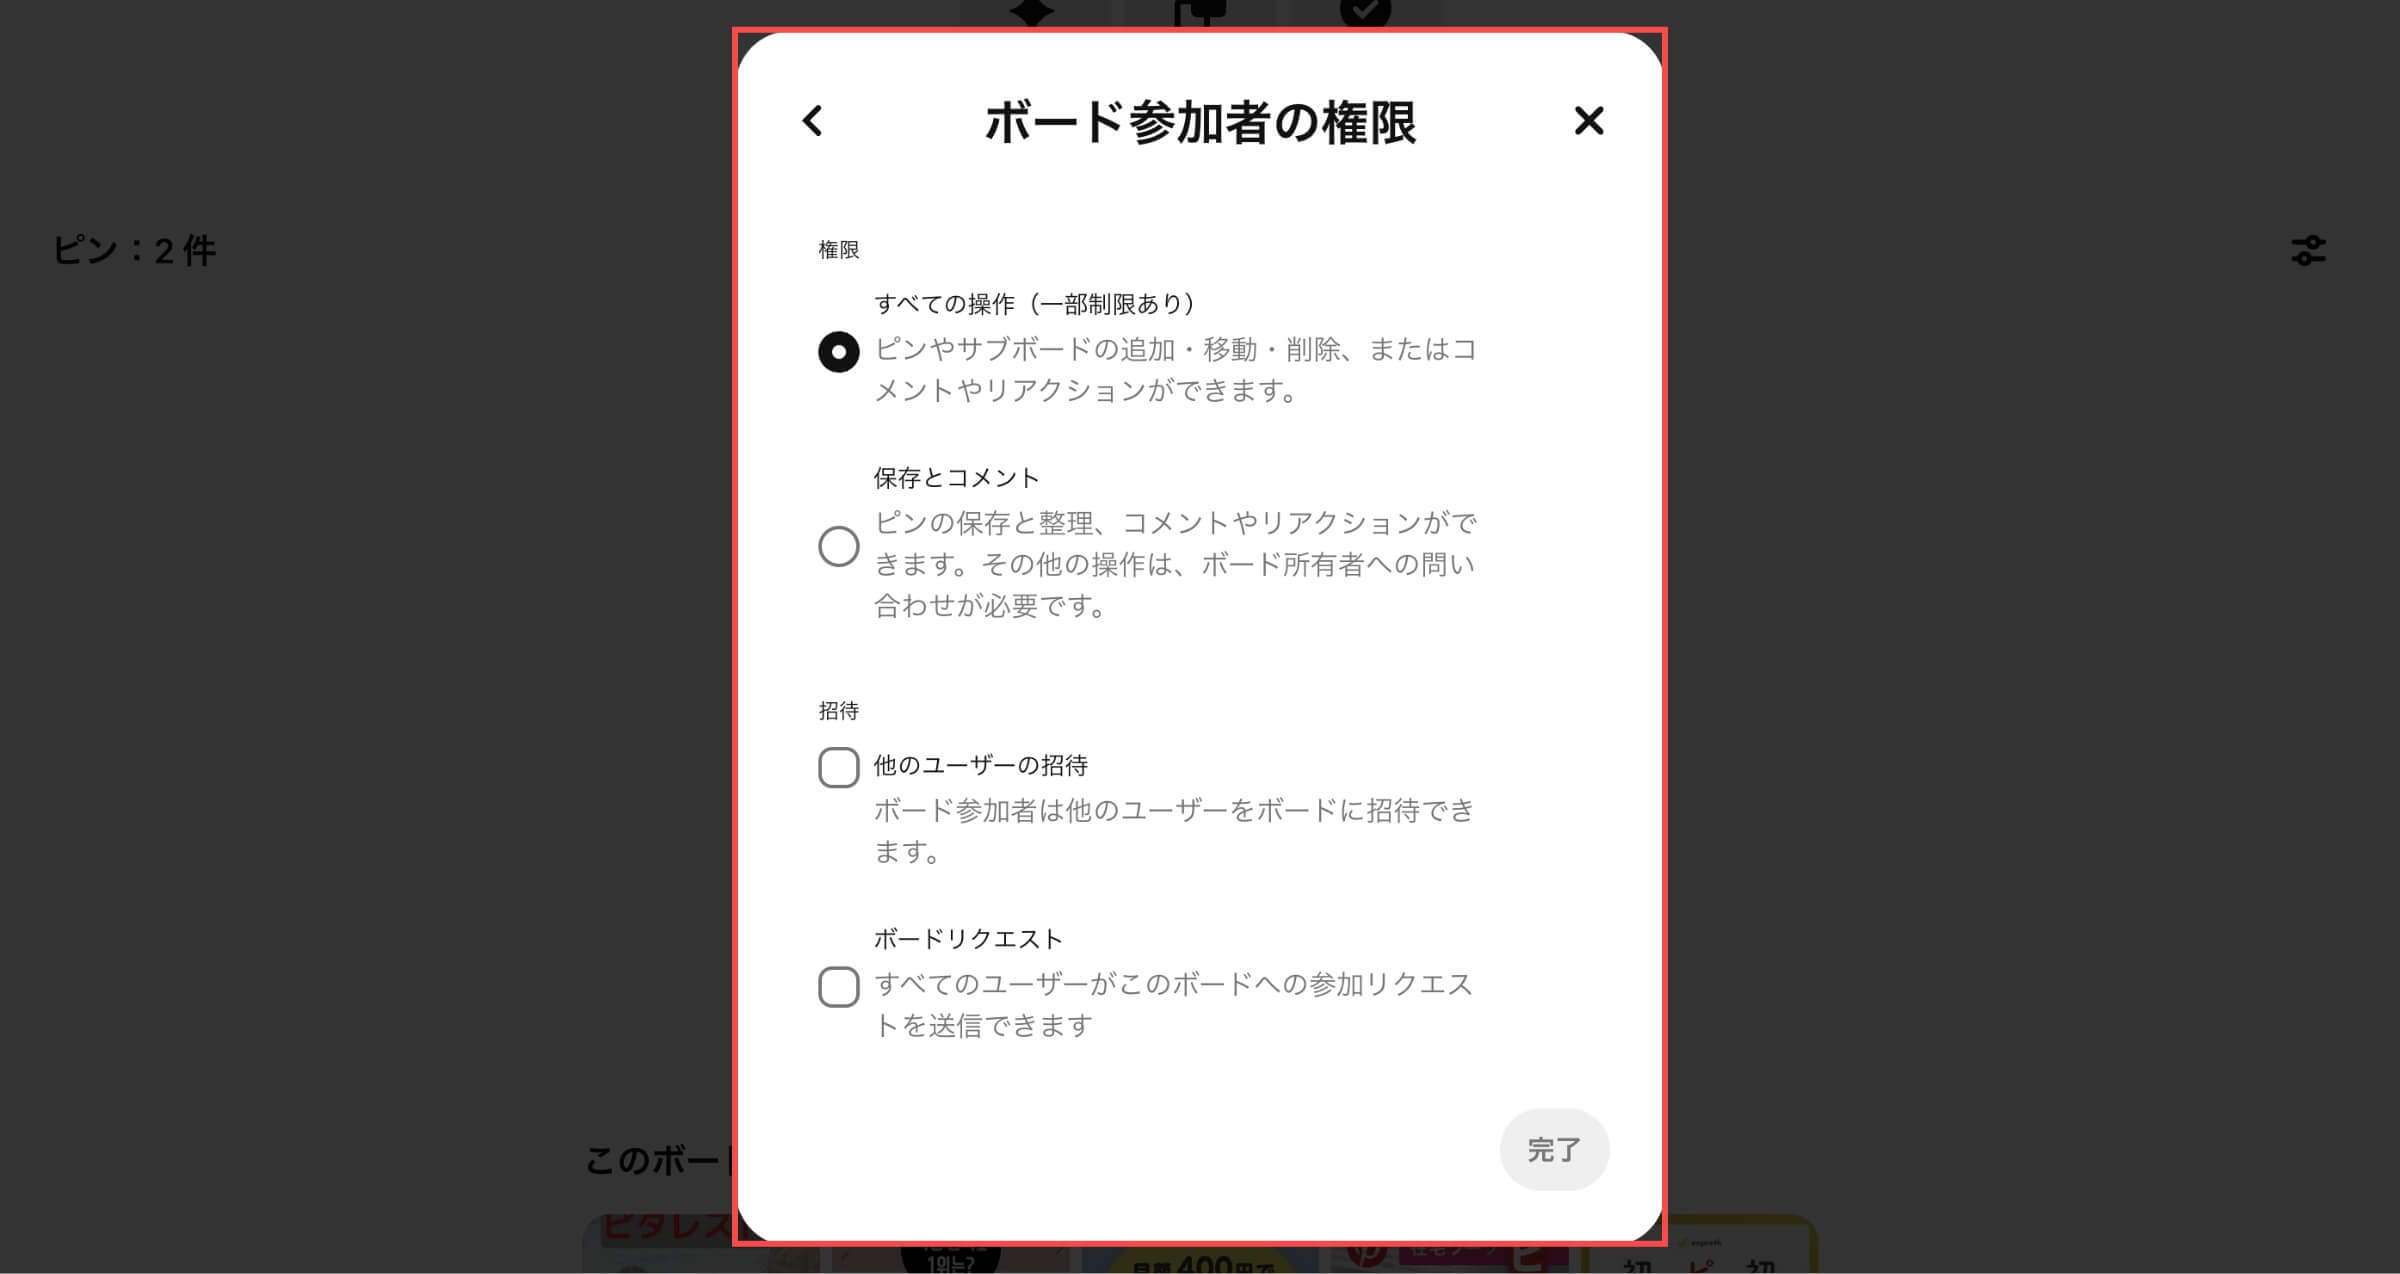
- すべての操作(一部制限あり)
- 保存とコメント
- 他のユーザーの招待
- ボードリクエスト
「グループボードを作成する」の解説は以上です。
シークレットボードを作成する
Pinterestのアカウントページから解説します。
- 「メニュー」ボタンをクリックします。
- 「ボードを編集する」をクリックします。

- 「このボードを非公開のままにする」にチェックを入れます。
- 「完了」ボタンをクリックします。
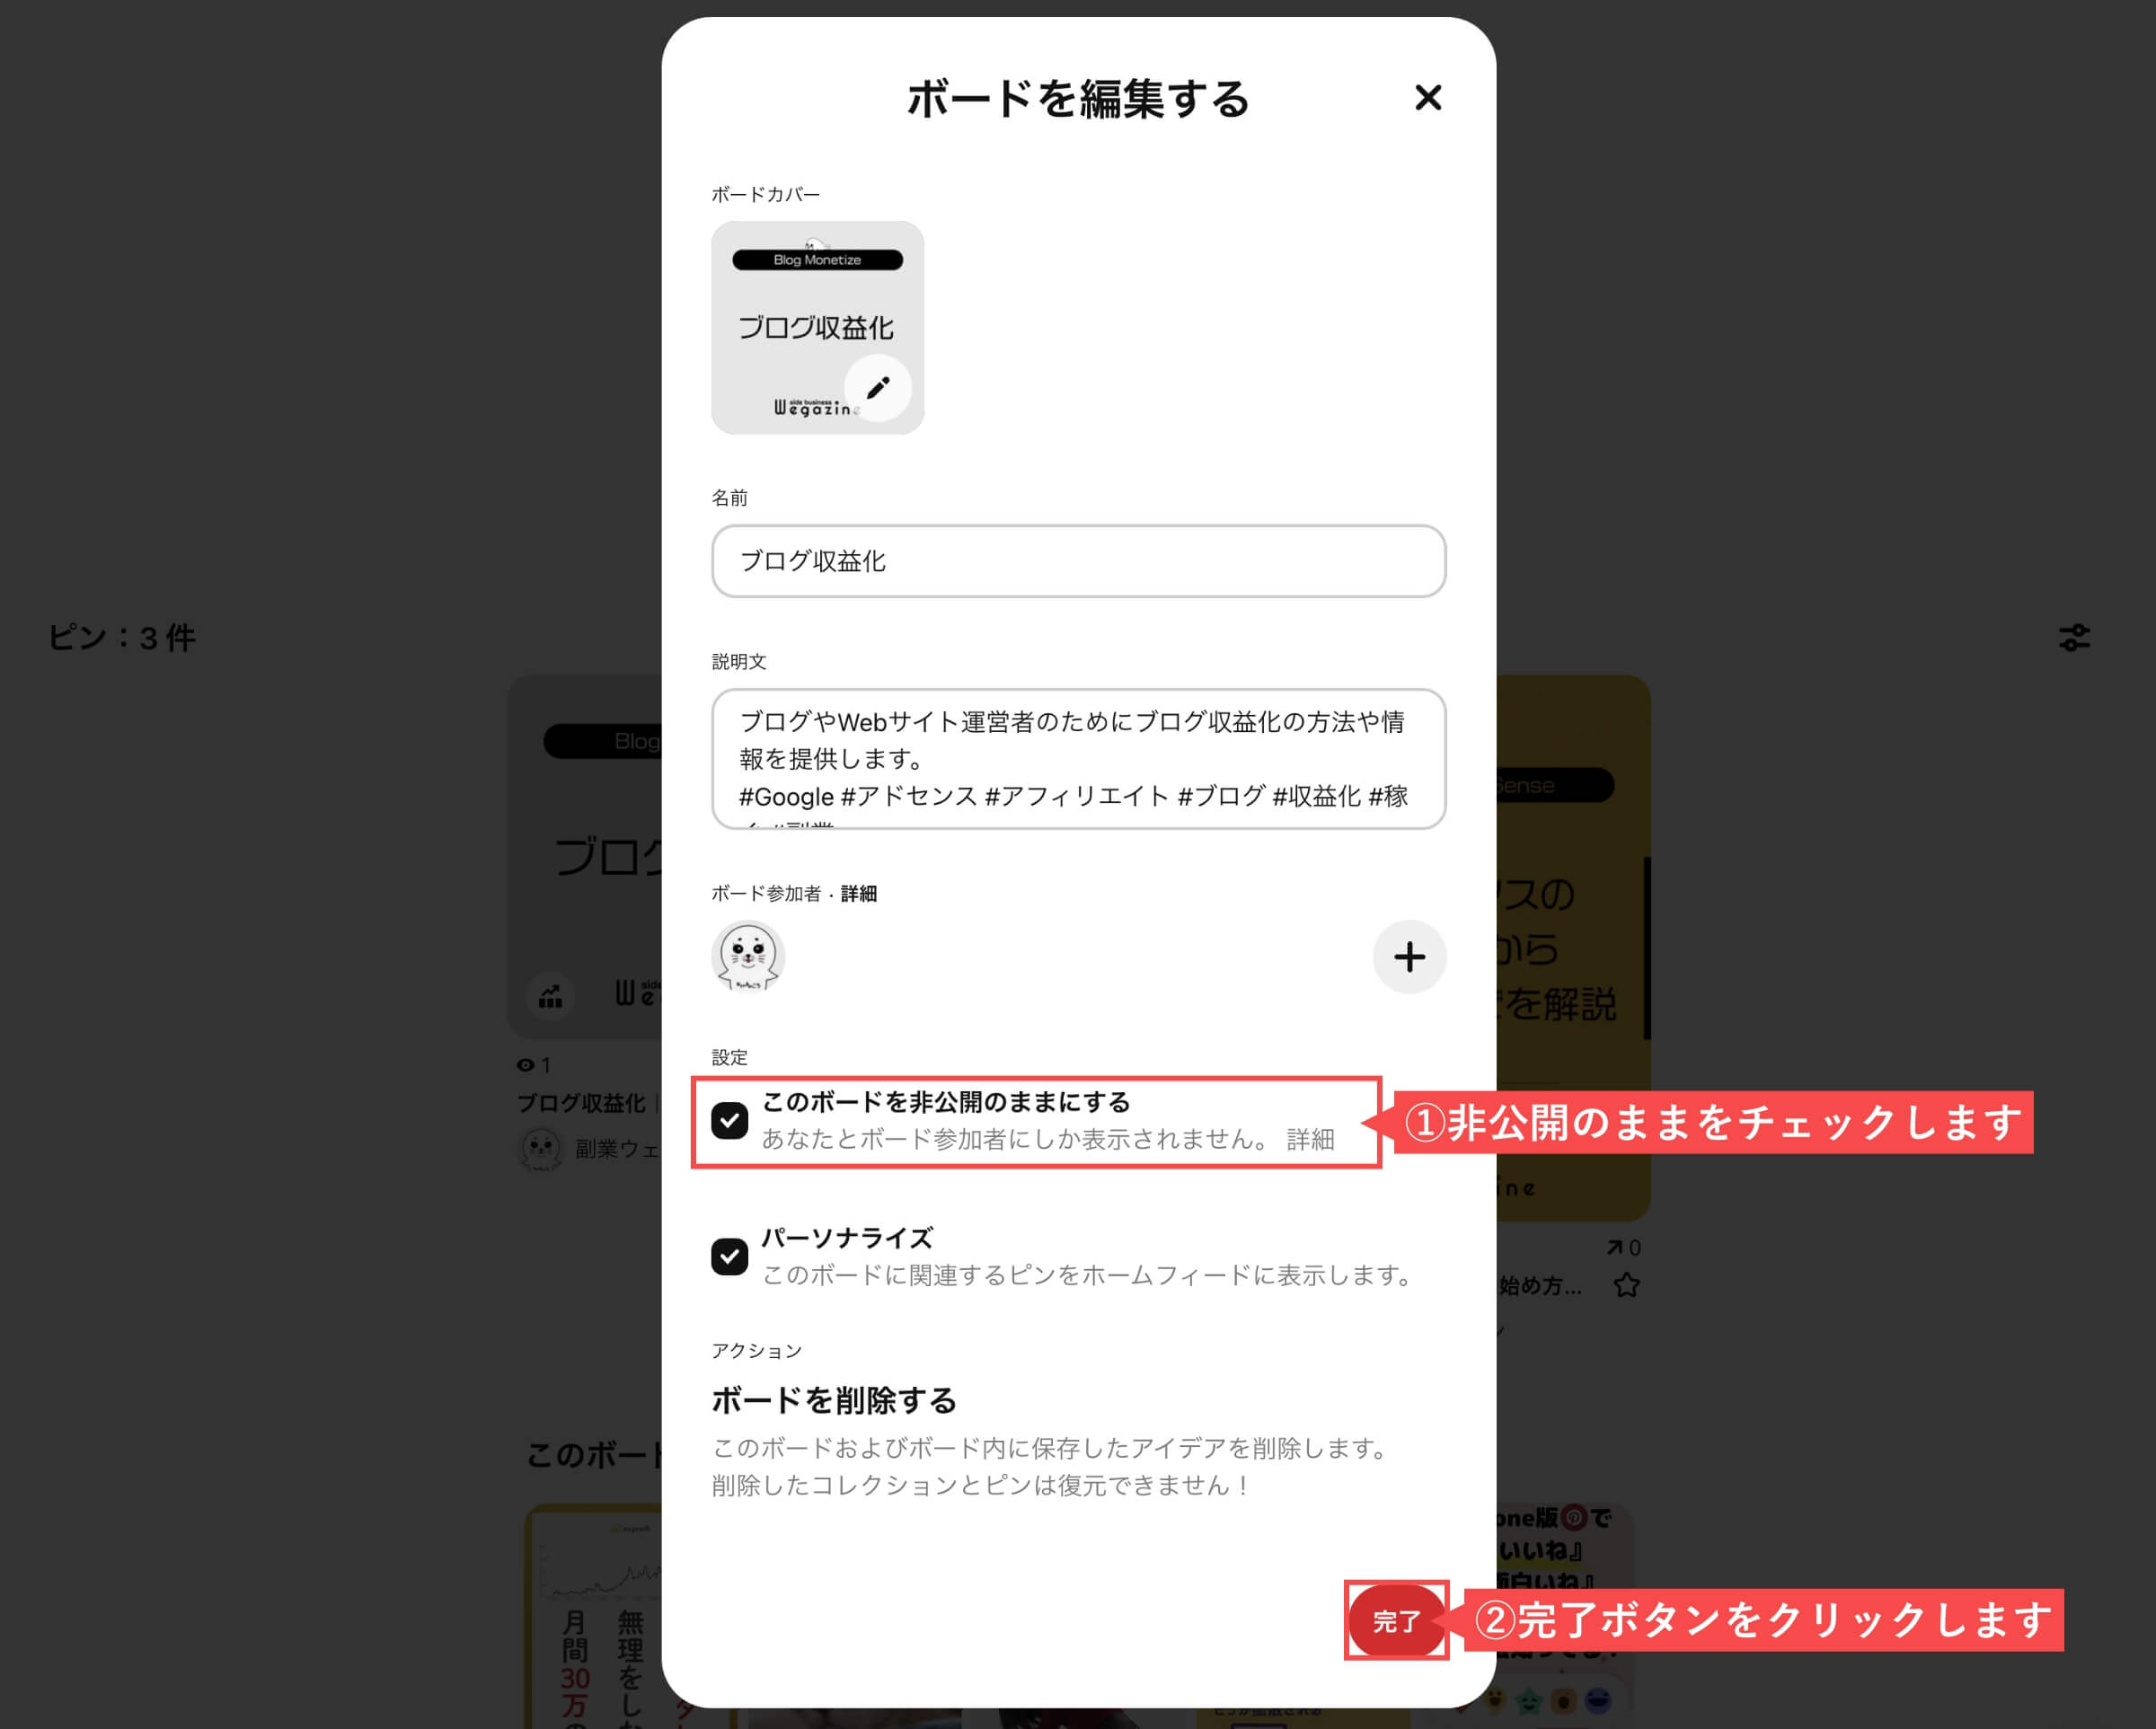
「シークレットボードを作成する」の解説は以上です。
Pinterestのボードを効果的に利用する方法
Pinterestのボードには、いくつかの効果的な利用方法があるので解説します。
- ボードとブログのカテゴリを合わせる
- ボードの説明文には検索ワードを入れる
- ボード名は一度決めたら変更しない
- ボードカバーを設定する
ボードとブログのカテゴリを合わせる
ブログやWebサイトへの集客が目的でボードを作成する場合に、ボード名はブログのカテゴリ名と合わせるようにしましょう。
ボード名とブログのカテゴリ名を合わせることで、ボードに登録するピンと記事の連携で迷うこともなくなります。
お互いの関連性を高めることで、ユーザーも迷わずにPinterestとブログを回遊することができます。
ボードの説明文には検索ワードを入れる
ボードのタイトルはブログのカテゴリ名と合わせる必要があるのである程度決まった文言になりますが、説明文は別で用意する必要があります。
説明文には、Pinterest内での検索ワードを意識した文言を入れる必要があります。
ハッシュタグ(#)を利用して、関連ワードだけを別で入力しておけば検索結果に表示されやすくなります。

ボード名は一度決めたら変更しない
ボード名は一度決めたら変更しないようにしましょう。
理由としては、ボードページのURLがそのままボード名で自動生成されるからです。
URLが変更されたことで「ボードのフォロワー」が外れることはありませんが、特別な理由がない限りはボード名の変更を行わないようにしてください。
ボードカバーを設定する
ボードはPinterest内の検索結果で表示されるので、ボードカバーを設定してユーザーが一目で何のカテゴリなのかわかるようにしましょう。
ボードカバーを設定することで、左側の大きなピンが固定されます。
設定しないと通常の最新のピンが表示されるため、変な位置でトリミングされてしまいます。
設定方法は「ボードカバーを設定する」をご確認ください。
まとめ
当記事では「Pinterestのボードを作成して効果的に利用する方法」について解説しました。
Pinterestのボードには、それ単体で集客効果を生む設定ができます。
ボードの中に大量のピンを登録する前に、ボードの役割を明確にしてからボードを作成してピンの登録を行いましょう。
- Pinterestのボードって何?
- Pinterestのボードの作成方法を知りたい。
- Pinterestのボードの効果的な利用方法が知りたい。
- Pinterestでブログへの集客効果を最大化したい。
上記のような悩みや疑問について解説しましたが、解決できましたでしょうか?
Pinterestの集客効果を最大化するための方法として、ボードを効果的に利用しましょう。
【Pinterest】ボードを作成して効果的に利用する方法(ブロガー必見)は以上となります。
最後までご覧いただきありがとうございました。